Introduction
Let’s take a look at setting up Discrete Device Assignment with a GPU. Windows Server 2016 introduces Discrete Device Assignment (DDA). This allows a PCI Express connected device, that supports this, to be connected directly through to a virtual machine.
The idea behind this is to gain extra performance. In our case we’ll use one of the four display adapters in our NVIDIA GROD K1 to assign to a VM via DDA. The 3 other can remain for use with RemoteFX. Perhaps we could even leverage DDA for GPUs that do not support RemoteFX to be used directly by a VM, we’ll see.
As we directly assign the hardware to VM we need to install the drivers for that hardware inside of that VM just like you need to do with real hardware.
I refer you to the starting blog of a series on DDA in Windows 2016:
Here you can get a wealth of extra information. My experimentations with this feature relied heavily on these blogs and MSFT provide GitHub script to query a host for DDA capable devices. That was very educational in regards to finding out the PowerShell we needed to get DDA to work! Please see A 1st look at Discrete Device Assignment in Hyper-V to see the output of this script and how we identified that our NVIDIA GRID K1 card was a DDA capable candidate.
Requirements
There are some conditions the host system needs to meet to even be able to use DDA. The host needs to support Access Control services which enables pass through of PCI Express devices in a secure manner. The host also need to support SLAT and Intel VT-d2 or AMD I/O MMU. This is dependent on UEFI, which is not a big issue. All my W2K12R2 cluster nodes & member servers run UEFI already anyway. All in all, these requirements are covered by modern hardware. The hardware you buy today for Windows Server 2012 R2 meets those requirements when you buy decent enterprise grade hardware such as the DELL PowerEdge R730 series. That’s the model I had available to test with. Nothing about these requirements is shocking or unusual.
A PCI express device that is used for DDA cannot be used by the host in any way. You’ll see we actually dismount it form the host. It also cannot be shared amongst VMs. It’s used exclusively by the VM it’s assigned to. As you can imagine this is not a scenario for live migration and VM mobility. This is a major difference between DDA and SR-IOV or virtual fibre channel where live migration is supported in very creative, different ways. Now I’m not saying Microsoft will never be able to combine DDA with live migration, but to the best of my knowledge it’s not available today.
The host requirements are also listed here: https://technet.microsoft.com/en-us/library/mt608570.aspx
- The processor must have either Intel’s Extended Page Table (EPT) or AMD’s Nested Page Table (NPT).
The chipset must have:
- Interrupt remapping: Intel’s VT-d with the Interrupt Remapping capability (VT-d2) or any version of AMD I/O Memory Management Unit (I/O MMU).
- DMA remapping: Intel’s VT-d with Queued Invalidations or any AMD I/O MMU.
- Access control services (ACS) on PCI Express root ports.
- The firmware tables must expose the I/O MMU to the Windows hypervisor. Note that this feature might be turned off in the UEFI or BIOS. For instructions, see the hardware documentation or contact your hardware manufacturer.
You get this technology both on premises with Windows Server 2016 as and with virtual machines running Windows Server 2016; Windows 10 (1511 or higher) and Linux distros that support it. It’s also an offering on high end Azure VMs (IAAS). It supports both Generation 1 and generation 2 virtual machines. All be it that generation 2 is X64 bit only, this might be important for certain client VMs. We’ve dumped 32 bit Operating systems over decade ago so to me this is a non-issue.
For this article I used a DELL PowerEdge R730, a NVIIA GRID K1 GPU. Windows Server 2016 TPv4 with CU of March 2016 and Windows 10 Insider Build 14295.
Microsoft supports 2 devices at the moment:
- GPUs and coprocessors
- NVMe (Non-Volatile Memory express) SSD controllers
Other devices might work but you’re dependent on the hardware vendor for support. Maybe that’s OK for you, maybe it’s not.
Below I describe the steps to get DDA working. There’s also a rough video out on my Vimeo channel: Discrete Device Assignment with a GPU in Windows 2016 TPv4.
Setting up Discrete Device Assignment with a GPU
Preparing a Hyper-V host with a GPU for Discrete Device Assignment
First of all, you need a Windows Server 2016 Host running Hyper-V. It needs to meet the hardware specifications discussed above, boot form EUFI with VT-d enabled and you need a PCI Express GPU to work with that can be used for discrete device assignment.
It pays to get the most recent GPU driver installed and for our NVIDIA GRID K1 which was 362.13 at the time of writing.

On the host when your installation of the GPU and drivers is OK you’ll see 4 NIVIDIA GRID K1 Display Adapters in device manager.

We create a generation 2 VM for this demo. In case you recuperate a VM that already has a RemoteFX adapter in use, remove it. You want a VM that only has a Microsoft Hyper-V Video Adapter.

In Hyper-V manager I also exclude the NVDIA GRID K1 GPU I’ll configure for DDA from being used by RemoteFX. In this show case that we’ll use the first one.

OK, we’re all set to start with our DDA setup for an NVIDIA GRID K1 GPU!
Assign the PCI Express GPU to the VM
Prepping the GPU and host
As stated above to have a GPU assigned to a VM we must make sure that the host no longer has use of it. We do this by dismounting the display adapter which renders it unavailable to the host. Once that is don we can assign that device to a VM.
Let’s walk through this. Tip: run PoSh or the ISE as an administrator.
We run Get-VMHostAssignableDevice. This return nothing as no devices yet have been made available for DDA.
I now want to find my display adapters
#Grab all the GPUs in the Hyper-V Host
$MyDisplays = Get-PnpDevice | Where-Object {$_.Class -eq “Display”}
$MyDisplays | ft -AutoSize
This returns

As you can see it list all adapters. Let’s limit this to the NVIDIA ones alone.
#We can get all NVIDIA cards in the host by querying for the nvlddmkm
#service which is a NVIDIA kernel mode driver
$MyNVIDIA = Get-PnpDevice | Where-Object {$_.Class -eq “Display”} |
Where-Object {$_.Service -eq “nvlddmkm”}
$MyNVIDIA | ft -AutoSize

If you have multiple type of NVIDIA cared you might also want to filter those out based on the friendly name. In our case with only one GPU this doesn’t filter anything. What we really want to do is excluded any display adapter that has already been dismounted. For that we use the -PresentOnly parameter.
#We actually only need the NVIDIA GRID K1 cards, let’s filter some #more,there might be other NVDIA GPUs.We might already have dismounted #some of those GPU before. For this exercise we want to work with the #ones that are mountedt he paramater -PresentOnly will do just that.
$MyNVidiaGRIDK1 = Get-PnpDevice -PresentOnly| Where-Object {$_.Class -eq “Display”} |
Where-Object {$_.Service -eq “nvlddmkm”} |
Where-Object {$_.FriendlyName -eq “NVIDIA Grid K1”}
$MyNVidiaGRIDK1 | ft -AutoSize
Extra info: When you have already used one of the display adapters for DDA (Status “UnKnown”). Like in the screenshot below.

We can filter out any already unmounted device by using the -PresentOnly parameter. As we could have more NVIDIA adaptors in the host, potentially different models, we’ll filter that out with the FriendlyName so we only get the NVIDIA GRID K1 display adapters.

In the example above you see 3 display adapters as 1 of the 4 on the GPU is already dismounted. The “Unkown” one isn’t returned anymore.
Anyway, when we run
$MyNVidiaGRIDK1 = Get-PnpDevice -PresentOnly| Where-Object {$_.Class -eq “Display”} |
Where-Object {$_.Service -eq “nvlddmkm”} |
Where-Object {$_.FriendlyName -eq “NVIDIA Grid K1”}
$MyNVidiaGRIDK1 | ft -AutoSize
We get an array with the display adapters relevant to us. I’ll use the first (which I excluded form use with RemoteFX). In a zero based array this means I disable that display adapter as follows:
Disable-PnpDevice -InstanceId $MyNVidiaGRIDK1[0].InstanceId -Confirm:$false
Your screen might flicker when you do this. This is actually like disabling it in device manager as you can see when you take a peek at it.
When you now run
$MyNVidiaGRIDK1 = Get-PnpDevice -PresentOnly| Where-Object {$_.Class -eq “Display”} |
Where-Object {$_.Service -eq “nvlddmkm”} |
Where-Object {$_.FriendlyName -eq “NVIDIA Grid K1”}
$MyNVidiaGRIDK1 | ft -AutoSize
Again you’ll see

The disabled adapter has error as a status. This is the one we will dismount so that the host no longer has access to it. The array is zero based we grab the data about that display adapter.
#Grab the data (multi string value) for the display adapater
$DataOfGPUToDDismount = Get-PnpDeviceProperty DEVPKEY_Device_LocationPaths -InstanceId $MyNVidiaGRIDK1[0].InstanceId
$DataOfGPUToDDismount | ft -AutoSize

We grab the location path out of that data (it’s the first value, zero based, in the multi string value).
#Grab the location path out of the data (it’s the first value, zero based)
#How do I know: read the MSFT blogs and read the script by MSFT I mentioned earlier.
$locationpath = ($DataOfGPUToDDismount).data[0]
$locationpath | ft -AutoSize

This locationpath is what we need to dismount the display adapter.
#Use this location path to dismount the display adapter
Dismount-VmHostAssignableDevice -locationpath $locationpath -force
Once you dismount a display adapter it becomes available for DDA. When we now run
$MyNVidiaGRIDK1 = Get-PnpDevice -PresentOnly| Where-Object {$_.Class -eq “Display”} |
Where-Object {$_.Service -eq “nvlddmkm”} |
Where-Object {$_.FriendlyName -eq “NVIDIA Grid K1”}
$MyNVidiaGRIDK1 | ft -AutoSize
We get:

As you can see the dismounted display adapter is no longer present in display adapters when filtering with -presentonly. It’s also gone in device manager.
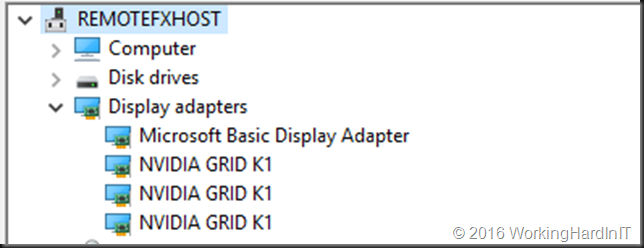
Yes, it’s gone in device manager. There’s only 3 NVIDIA GRID K1 adaptors left. Do note that the device is unmounted and as such unavailable to the host but it is still functional and can be assigned to a VM.That device is still fully functional. The remaining NVIDIA GRID K1 adapters can still be used with RemoteFX for VMs.
It’s not “lost” however. When we adapt our query to find the system devices that have dismounted I the Friendly name we can still get to it (needed to restore the GPU to the host when needed). This means that -PresentOnly for system has a different outcome depending on the class. It’s no longer available in the display class, but it is in the system class.

And we can also see it in System devices node in Device Manager where is labeled as “PCI Express Graphics Processing Unit – Dismounted”.
We now run Get-VMHostAssignableDevice again see that our dismounted adapter has become available to be assigned via DDA.

This means we are ready to assign the display adapter exclusively to our Windows 10 VM.
Assigning a GPU to a VM via DDA
You need to shut down the VM
Change the automatic stop action for the VM to “turn off”
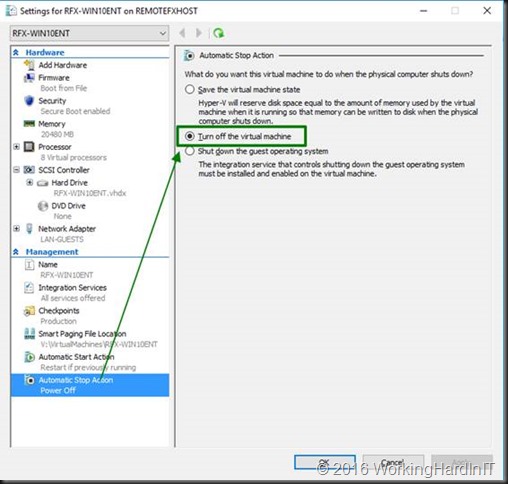
This is mandatory our you can’t assign hardware via DDA. It will throw an error if you forget this.
I also set my VM configuration as described in https://blogs.technet.microsoft.com/virtualization/2015/11/23/discrete-device-assignment-gpus/
I give it up to 4GB of memory as that’s what this NVIDIA model seems to support. According to the blog the GPUs work better (or only work) if you set -GuestControlledCacheTypes to true.
“GPUs tend to work a lot faster if the processor can run in a mode where bits in video memory can be held in the processor’s cache for a while before they are written to memory, waiting for other writes to the same memory. This is called “write-combining.” In general, this isn’t enabled in Hyper-V VMs. If you want your GPU to work, you’ll probably need to enable it”
#Let’s set the memory resources on our generation 2 VM for the GPU
Set-VM RFX-WIN10ENT -GuestControlledCacheTypes $True -LowMemoryMappedIoSpace 2000MB -HighMemoryMappedIoSpace 4000MB
You can query these values with Get-VM RFX-WIN10ENT | fl *
We now assign the display adapter to the VM using that same $locationpath
Add-VMAssignableDevice -LocationPath $locationpath -VMName RFX-WIN10ENT
Boot the VM, login and go to device manager.
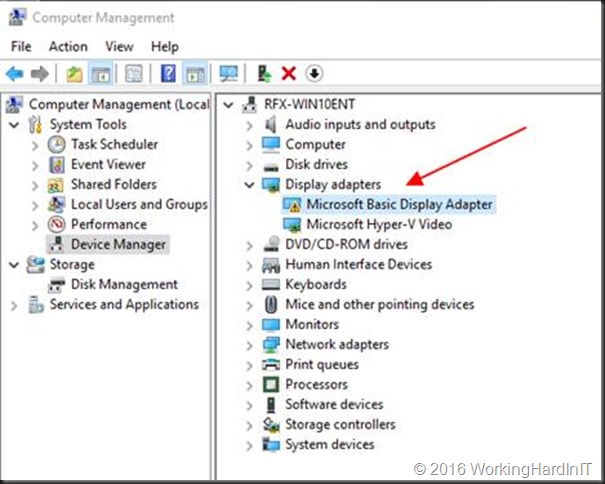
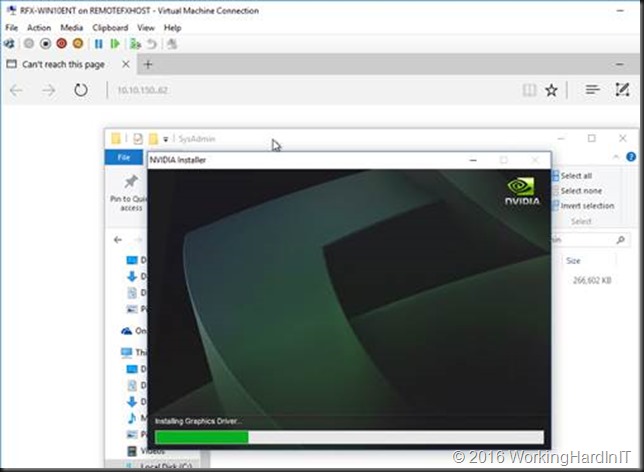
We now need to install the device driver for our NVIDIA GRID K1 GPU, basically the one we used on the host.
Once that’s done we can see our NVIDIA GRID K1 in the guest VM. Cool!
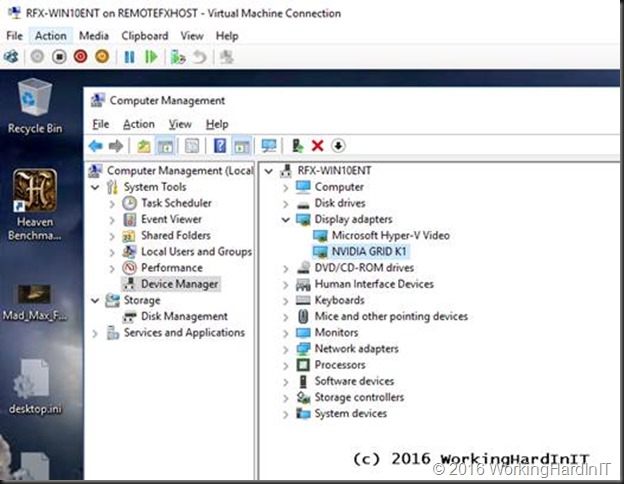
You’ll need a restart of the VM in relation to the hardware change. And the result after all that hard work is very nice graphical experience compared to RemoteFX
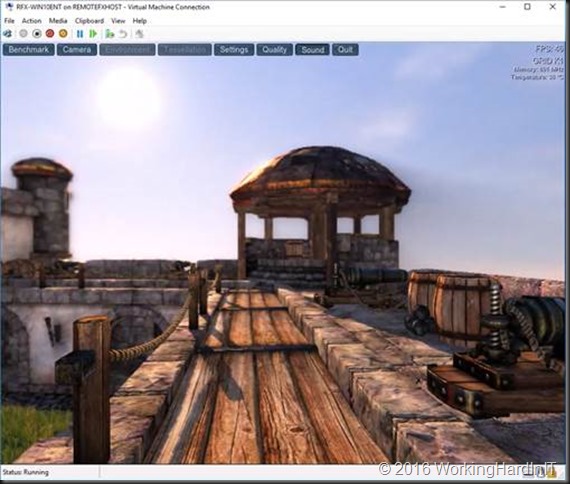
What you don’t believe it’s using an NVIDIA GPU inside of a VM? Open up perfmon in the guest VM and add counters, you’ll find the NVIDIA GPU one and see you have a GRID K1 in there.
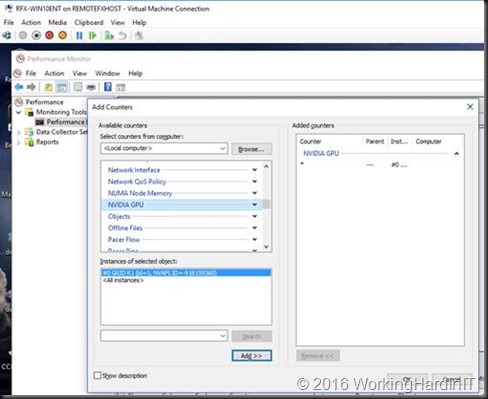
Start some GP intensive process and see those counters rise.

Remove a GPU from the VM & return it to the host.
When you no longer need a GPU for DDA to a VM you can reverse the process to remove it from the VM and return it to the host.
Shut down the VM guest OS that’s currently using the NVIDIA GPU graphics adapter.
In an elevated PowerShell prompt or ISE we grab the locationpath for the dismounted display adapter as follows
$DisMountedDevice = Get-PnpDevice -PresentOnly |
Where-Object {$_.Class -eq “System” -AND $_.FriendlyName -like “PCI Express Graphics Processing Unit – Dismounted”}
$DisMountedDevice | ft -AutoSize

We only have one GPU that’s dismounted so that’s easy. When there are more display adapters unmounted this can be a bit more confusing. Some documentation might be in order to make sure you use the correct one.
We then grab the locationpath for this device, which is at location 0 as is an array with one entry (zero based). So in this case we could even leave out the index.
$LocationPathOfDismountedDA = ($DisMountedDevice[0] | Get-PnpDeviceProperty DEVPKEY_Device_LocationPaths).data[0]
$LocationPathOfDismountedDA

Using that locationpath we remove the DDA GPU from the VM
#Remove the display adapter from the VM.
Remove-VMAssignableDevice -LocationPath $LocationPathOfDismountedDA -VMName RFX-WIN10ENT
We now mount the display adapter on the host using that same locationpath
#Mount the display adapter again.
Mount-VmHostAssignableDevice -locationpath $LocationPathOfDismountedDA
We grab the display adapter that’s now back as disabled under device manager of in an “error” status in the display class of the pnpdevices.
#It will now show up in our query for -presentonly NVIDIA GRIDK1 display adapters
#It status will be “Error” (not “Unknown”)
$MyNVidiaGRIDK1 = Get-PnpDevice -PresentOnly| Where-Object {$_.Class -eq “Display”} |
Where-Object {$_.Service -eq “nvlddmkm”} |
Where-Object {$_.FriendlyName -eq “NVIDIA Grid K1”}
$MyNVidiaGRIDK1 | ft -AutoSize

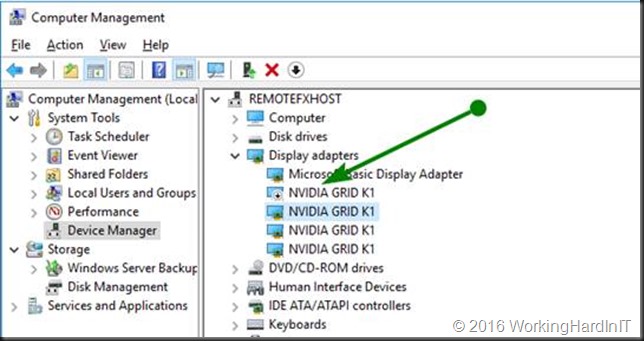
We grab that first entry to enable the display adapter (or do it in device manager)
#Enable the display adapater
Enable-PnpDevice -InstanceId $MyNVidiaGRIDK1[0].InstanceId -Confirm:$false
The GPU is now back and available to the host. When your run you Get-VMHostAssignableDevice it won’t return this display adapter anymore.
We’ve enabled the display adapter and it’s ready for use by the host or RemoteFX again. Finally, we set the memory resources & configuration for the VM back to its defaults before I start it again (PS: these defaults are what the values are on standard VM without ever having any DDA GPU installed. That’s where I got ‘m)
#Let’s set the memory resources on our VM for the GPU to the defaults
Set-VM RFX-WIN10ENT -GuestControlledCacheTypes $False -LowMemoryMappedIoSpace 256MB -HighMemoryMappedIoSpace 512MB

Now tell me all this wasn’t pure fun!


