What is the SecretStore local vault extension
The SecretStore local vault extension is a PowerShell module extension vault for Microsoft.PowerShell.SecretManagement. It is a secure storage solution that stores secret data on the local machine. It is based on .NET cryptography APIs, and works on Windows, Linux, macOS thanks to PowerShell Core.
The secret data is stored at rest in encrypted form on the file system and decrypted when returned to a user request. The store file data integrity is verified using a cryptographic hash embedded in the file.
The store can be configured to require a password or operate password-less. Requiring a password adds to defense-in-depth since password-less operation relies solely on file system protections. Password-less operation still encrypts data, but the encryption key is stored on file and is accessible. Another configuration option is the password timeout, which by default is 15 minutes for automation purposes you can use Unlock-SecretStore to enter the password for the current PowerShell session for the duration of the timeout period.
Testing the SecretStore local vault extension
Below you will find a demonstration script where I register a vault of the type secret store. This is a local vault extension that creates its data and configuration files in the currently logged-in user scope. You specify the vault type to register by the ModuleName parameter.
$MySecureVault1 = 'LocalSecVault1'
#Register Vault1 in secret store
Register-SecretVault -ModuleName Microsoft.PowerShell.SecretStore -Name
$MySecureVault1 -DefaultVault
#Verify the vault is there
Get-SecretVault
#Add secrets to Vault 1
Set-Secret -Name "DATAWISETECH\serverautomation1in$MySecureVault1" -Secret "pwdserverautom1" -Vault $MySecureVault1
Set-Secret -Name "DATAWISETECH\serverautomation2in$MySecureVault1" -Secret "pwdserverautom2" -Vault $MySecureVault1
Set-Secret -Name "DATAWISETECH\serverautomation3in$MySecureVault1" -Secret "pwdserverautom3" -Vault $MySecureVault1
#Verify secrets
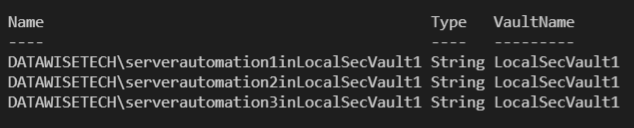
Get-SecretInfo
Via Get-SecetInfo I can see the three secrets I added to the vault LocalSecVault1
The configuration and data are stored in separate files. The file location depends on the operating system. For Windows this is %LOCALAPPDATA%\Microsoft\PowerShell\secretmanagement\localstore. For Linux and MacOS it is $HOME/.secretmanagement/localstore/
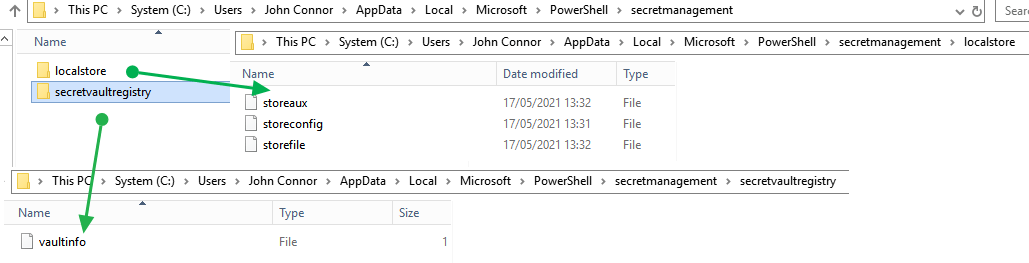
As you can see this happens under the user context. Support for all users or machine-wide context or scope is a planned future capability, but this is not available yet.
Access to the SecretStore files is via NTFS file permissions (Windows) or access control lists (Linux) limiting access to the specific user/owner.
Multiple Secret stores
It is possible in SecretManagement to register an extension vault multiple times. The reason for this is that an extension vault may support different contexts via the registration VaultParameters.
At first, it might seem that this means we can create multiple SecretStores but that is not the case. The SecretStore vault currently operates under the scope of the currently logged-on user at a very specific path. As a result, it confused me when I initially tried to create multiple SecretStores. I could see all the secrets of the other stores. Initially, that is what I thought happend. Consequenlty, I had a little security scare.. In reality, I just register different vault names to the same SecretStore as there is only one.
$MySecurevault2 = 'LocalSecVault2'
$MySecureVault3 = 'LocalSecVault3'
#Register two more vaults to secret store
Register-SecretVault -ModuleName Microsoft.PowerShell.SecretStore -Name $MySecurevault2 -DefaultVault
Register-SecretVault -ModuleName Microsoft.PowerShell.SecretStore -Name $MySecureVault3 -DefaultVault
#Note that all vaults contain the secrets of Vault1
Get-SecretInfo
#Add secrets to Vault 2
Set-Secret -Name "DATAWISETECH\serverautomation1in$MySecureVault2" -Secret "pwdserverautom1" -Vault $MySecureVault2
Set-Secret -Name "DATAWISETECH\serverautomation2in$MySecureVault2" -Secret "pwdserverautom2" -Vault $MySecureVault2
Set-Secret -Name "DATAWISETECH\serverautomation3in$MySecureVault2" -Secret "pwdserverautom3" -Vault $MySecureVault2
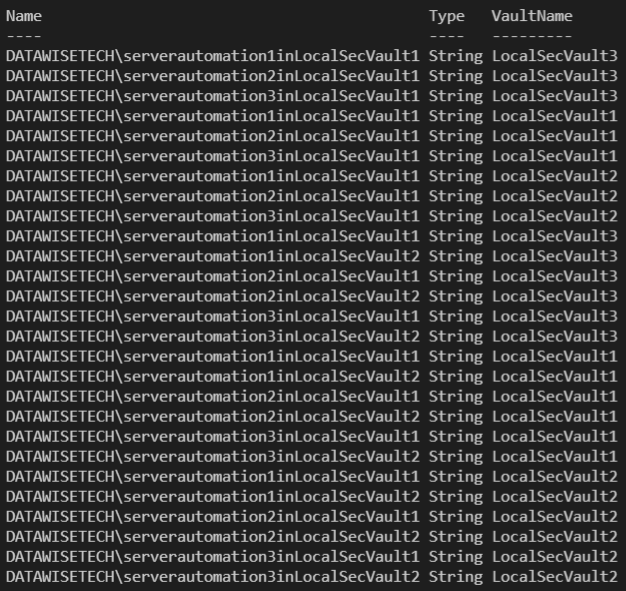
#Note that all vaults contain the secrets of Vault1 AND Vault 2
Get-SecretInfo
Now, if you think, that multiple SecretStores per user scope are a good idea there is an open request to support this: Request: Multiple instances of SecretStore · Issue #58 · PowerShell/SecretStore (github.com).