Check vhid, password and virtual IP address Kemp LoadMaster

Introduction

Recently I was implementing a high available Kemp LoadMaster X15 system. I prepared everything, documented the switch and LM-X15 configuration, and created a VISIO to visualize it all. That, together with the migration and rollback scenario was all presented to the team lead and the engineer who was going to work on this with us. I told the team lead that all would go smoothly if my preparations were good and I did not make any mistakes in the configuration. Well, guess what, I made a mistake somewhere and had to solve a Kemp LoadMaster ad digest – md2=[31084da3…] md=[20dcd914…] – Check vhid, password and virtual IP address log entry.

Check vhid, password and virtual IP address

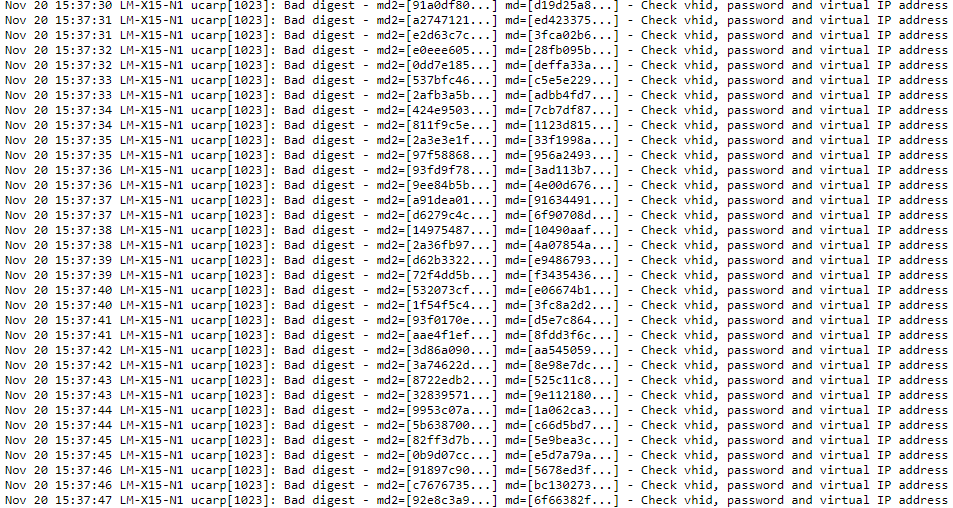
As, while all was working well, we saw the following entry inundate the system message file log:

<date> <LoadMasterHostName> ucarp[2193]: Bad digest – md2=[xxxxx…] md=[xxxxx…] – Check vhid, password and virtual IP address

Check vhid, password and virtual IP address
every second …

Wait a minute, as far as I know all was OK. The VHID was unique for the HA pair and we did not have duplicate IP addresses set anywhere on other network appliances. So what was this about?

Figuring out the cause

Well, we have a bond0 on eth0 and eth2 for the appliance management. We also have eth1 which is a special interface used for L1 health checks between the Loadmasters. We don’t use a direct link (different racks) so we configure them with an IP on a separate dedicated subnet. Then we have the bonds with the VLAN for the actual workloads via Virtual Services.

We have heartbeat health checks on bond0, eth1 and on at least one VLAN per bonds for the workloads.

Confirm that Promiscuous mode and PortFast are enabled. Check!
HA is configured for multicast traffic in our setup so we confirm that the switch allows multicast traffic. Check!

Make sure that switch configurations that block multicast traffic, such as ‘IGMP snooping’, are disabled on the switch/switch ports as needed. Check!

Now let’s look at possible causes and check our confguration:

So what else? The documentation states as possible other causes the following:

  1. There is another device on the network with the same HA Virtual ID. The LoadMasters in a HA pair should have the same HA Virtual ID. It is possible that a third device could be interfering with these units. As of LoadMaster firmware version 7.2.36, the LoadMaster selects a HA Virtual ID based on the shared IP address of the first configured interface (the last 8 bits). You can change the value to whatever number you want (in the range 1 – 255), or you can keep it at the value already selected. Check!
  2. An interface used for HA checks is receiving a packet from a different interface/appliance. If the LoadMaster has two interfaces connecting to the same switch, with Use for HA checks enabled, this can also cause these error messages. Disable the Use for HA checks option on one of the interfaces to confirm the issue. If confirmed, either leave the option disabled or move the interface to a separate switch.

I am sure there is no interference from another appliance. Check! As we had checked every other possible cause the line in red caught my attention. Could it be?

Time for some packet captures

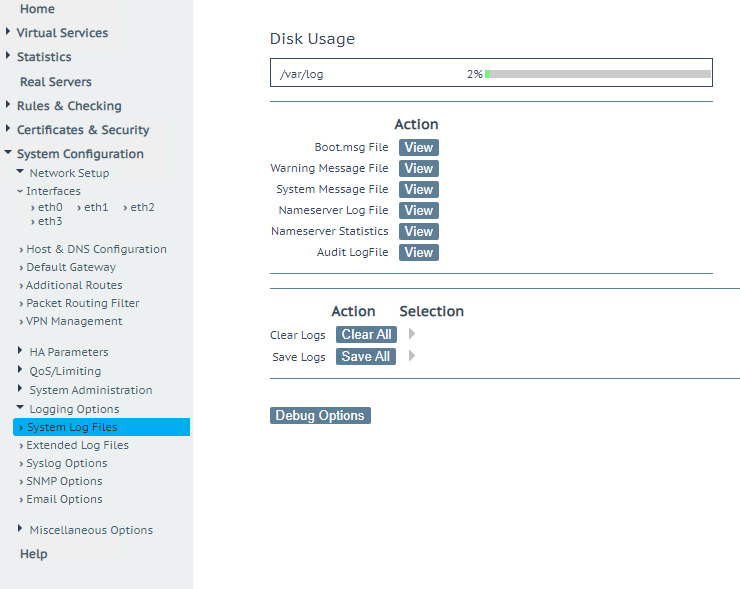
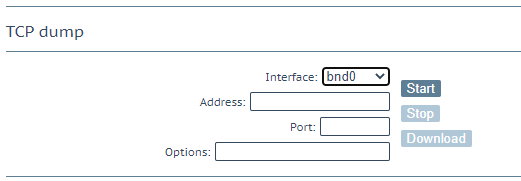
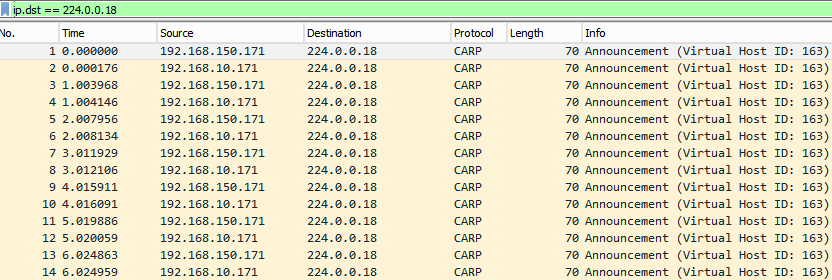
So we took a TCP dump on bond0 and looked at it in Wireshark. You can make a TCP dump via debug options under System Log Files.

Check vhid, password and virtual IP address
Debug Options, once there find TCP dump.

Select your interface, click start, after 10 seconds or so click stop and download the dump

TCP dump

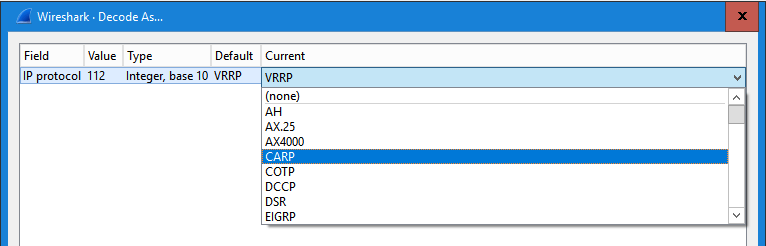
Do note that Wireshark identifies this as VRRP, but the LoadMaster uses CARP (open source) do set it to decode as CARP, that way you’ll see more interesting information in Info

No, not proprietary VRRP but CARP

Also filter on ip.dst == 244.0.0.18 (multicast address). What we get here is that on eth0 we see multicasts from eth1. That is the case described in the documentation. Aha!

Check vhid, password and virtual IP address
Aha, we see CARP multicasts from eth1 on eth0, that is what we call a clue!

So now what, do we need to move eth1 to another switch to solve this? Or disable the HA check? No, luckily not. Read on.

The fix for Check vhid, password and virtual IP address

No, I did not use one or more separate switches just to plug in the heartbeat HA interfaces on the LoadMasters. What I did is create a separate VLAN for the eth0 HA heartbeat uplink interfaces on the switches. This way I ensure that they are in a separate unicast group from the management interface uplinks on the switches

By selecting a different VLAN for the MGNT and Heartbeat interface uplink they are in different TV VLAN groups by default.

By default the Multicast TV VLAN Membership is per VLAN. The reason the actual workload interfaces did not cause an issue when we enabled HA checks is that these were trunk ports with a number of allowed VLANs, different from the management VLAN, which prevents this error being logged in the first place.

That this works was confirmed in the packet trace from the LM-X15 after making the change.

No more packets received from a different interface. Mission accomplished.

So that was it. The error was gone and we could move along with the project.

Conclusion

Well, I should have know as normally I do put those networks not just in a separate subnet but also make sure they are on different VLANs. This goes to show that no matter how experienced you are and how well you prepare you will still make mistakes. That’s normal and that’s OK, it means you are actually doing something. Key is how you deal with a mistake and that why I wrote this. To share how I found out the root cause of the issue and how I fixed it. Mistakes are a learning opportunity, use them as such. I know many organizations frown upon a mistake but really, these should grow up and don’t act this silly.

LoadMaster LMOS 7.2.52 firmware feature enhancements

LoadMaster LMOS 7.2.52 firmware feature enhancements

Let’s take a look at some of the recently released LoadMaster LMOS 7.2.52 firmware feature enhancements. You can read the release notes on their web site. Next to security updates there are two entries in the new features and change notices that caught my attention. The first is the new feature that delivers the Ability to use SNI in SubVS, as well as SNI-Hostname Pass-Through. Secondly, it is the enhancement that we can now configure Per-VS Health Check Settings. Both are very welcome as I have to deal with such scenarios or needs frequently. So let’s take a look.

Ability to use SNI in SubVS, as well as SNI-Hostname Pass-Through

The Server Name Indication (SNI) feature has been enhanced to support the following:

  • The ability to pass through the original hostname as the SNI hostname to the Real Server.
  • The ability to specify a different (manual) SNI hostname per SubVS. This is the same as the previous functionality to specify this on the parent Virtual Service (Reencryption SNI Hostname) but on the SubVS level with content switching.


These new features help make scenarios, where you may want to consolidate as many services as possible to the least amount of IP addresses, easier and less confusing to implement.

The Pass-through SNI hostname check box is available in the SSL Properties section of the Virtual Service modify screen. When this is enabled and when re-encrypting, the received SNI hostname is passed through as the SNI to be used to connect to the Real Server. If the Virtual Server has a Reencryption SNI Hostname set, this overrides the received SNI.

LoadMaster LMOS 7.2.52 firmware feature enhancements
The pass-through SNI hostname can be overridden at the VS level

It is also possible to set the re-encryption SNI hostname in a SubVS (in the Basic Properties section). If it is set in a SubVS, this overrides the parent Virtual Service value and/or the received SNI value.

LoadMaster LMOS 7.2.52 firmware feature enhancements
You can also define the Reencryption SNI Hostname at the subVS level

Per-VS Health Check Settings

Until now, health check settings were global-only, located on the Rule & Checking > Check Parameters UI page: Check Interval, Connect Timeout, and Retry Count

LoadMaster LMOS 7.2.52 firmware feature enhancements
We still have global Service Check Parameters, but the can be overridden now at the VS and subVS level

Now, we can also configure these settings on the Virtual Service Real Servers tab. This means we can tune the health check behavior for specific VSs and SubVSs. By default, real server health checks use the global settings. The VS or SubVS settings change as the global settings change. So the default behaves as in previous releases.

LoadMaster LMOS 7.2.52 firmware feature enhancements
You can mix: customize the check interval, use the defautl value for the timeout and leverage the global setting for the retry value.

Once you change a check parameter on a VS or SubVS level, however, those custom VS or SubVS settings will remain unchanged regardless of changes made to the global setting. The UI indicates whether the currently in-use value is the global value or is set to a custom value.

Conclusion

I am really happy with the enhancements that are introduced with FW 7.2.52. The two I highlighted above are the ones I really come up against in the future. Not having a re-encryption SNI hostname on the SubVS level was something we could workaround (see How to Re-Encrypt Multiple SNIs on the Same IP and Port with Kemp LoadMaster – PART 1 and How to Re-Encrypt Multiple SNIs on the same IP and port with a Kemp LoadMaster – PART 2). But having this feature on the subVS makes life a lot easier.

Being able to set the real server health check interval, timeout, and retry count helps us in those scenarios where we have services with different needs. These global setting where always a balancing act between all the services. So this capability is very welcome as well.

It is great to see Kemp Technologies their offerings evolve and improve. They have established themselves quite well over the years. It makes me happy that way back I chose them for their price/value and excellent support. I still remember the first HA pair (LM-2200) I ever deployed (2011) for a real time reference GPS position system. That was the beginning of a very succesful journey building solutions with LoadMasters using both physical and virtual appliances.

Load balancing UDP for a RD Gateway farm with a KEMP Loadmaster

When implementing load balancing for RD Gateway we must take care not to forget load balancing the UDP traffic. Now your RDP Connection will still work over HTTPS alone if you forget this, but you’ll miss out on the benefits.

  • Better experience of bad, unreliable network connections with high packet loss
  • Better experience with high end graphics and in general a better graphical experience over WAN links.

As many people have load balanced their gateways since Windows Server 2008 (R2) when UDP was not into play yet and as things work without people might forget. The most important thing you need to know is that when leveraging UDP for RDP 8/8.1 the UDP session traffic has to leverage Direct Server Return (DSR) for the real servers configuration when we configure load balancing for a RD gateway farm with a KEMP Loadmaster. I’m focusing on the UDP part here, not the HTTPS part. That’s been done enough and the Kemp info on that is sufficient. The UDP part could do with some extra info.

The reason for this is that when UDP is leveraged for high end graphics we want to avoid sending all that graphical network traffic the load balancer. There is no real added value being performed there in this UDP use case but the load might get quite high. This is where DSR is leveraged wen configuring the Loadmaster. That means we also need to configure our real servers to uses Direct Return as the forwarding method. When you forget this you’ll lose UDP with RDP 8.1 but you might not notice immediately. If you’re not looking for it as the HTTP connection alone will let you connect and work, albeit with a reduced experience.

To read more on why it’s done this way (even if it seems complex and has drawbacks) see http://kemptechnologies.com/ca/white-papers/direct-server-return-it-you/ you’ll notice that for graphics it is great idea. By selecting Direct Server Return as the  forwarding method (see later) changes the destination MAC address of the incoming packet on the fly (very fast) to the MAC address of one of the real servers. When the packet reaches the real server it must think it owns the VS IP address, which it doesn’t. So we use the loopback adapter to let the real server reply as if it does but we don’t respond to ARPs as that would cause issues with the load balancer who has the real IP of the virtual service. That’s where the 254 metric we configure in the demo below comes into play.  Note that  the real server responds over it normal NIC. Which is great and it helps with firewall rules not ruining the party. That’s why with DSR which leverages the the loopback adapter on the RD Gateway servers also requires you to configure the weak host / strong host behavior for the network configuration on those servers, it’s not answering itself! I’ll not go into details on this here but basically since Windows Vista and Windows Server 2008 the security model has change from weak host to strong host. This means that a system (that is not acting as a router) cannot send or receive any packets on a given interface unless the destination/source IP in the packet is assigned to the interface. In the “weak host” model, this restriction does not apply. Read more about this here. Let’s walk through this UDP/DSR/weak host setup & configuration.

On your Loadmaster you’ll create a virtual service for UDP traffic.

  • Select Virtual Services > Add New.
  • Enter the IP address of your RD Gateway Farm
  • Set 3391 as the Port.
  • Select udp for the Protocol.
  • Click Add this Virtual Service.

Open up the Standard Options to configure those

image

  • We don’t need layer 7 as the UDP connections are tied to the HTPP connection and they will spawn and die with that one.
  • We select Source IP Address as the Persistence Mode as the RD Gateway needs persistence to guarantee the connection stay together on the same RD Gateway server. Set the time out value no to high so it isn’t remembered to long.
  • We select least connections as that’s the best option in most cases, let the farm node with the least load take on new connections. This is handy after down time for example.

Now head over to the Real Servers section

image

  • Make sure the Real Server Check parameters is set to ICMP ping, which is what the LoadMaster uses to check if the RD Gateway servers are alive.
  • Click Add New to add an  RD Gateway server, you’ll do this for each farm member.

image

  • Enter the Real Server Address for each RD Gateway.
  • Enter 3391 as the Port.
  • Select Direct return as the Forwarding method.
  • Click Add This Real Server.

When you’re done it looks like this:

image

So now we need to check if the real servers are seen as on line and healthy …

image

If one RD Gateway server is down or has an issue you see this … no worries the LoadMaster sends all clients to the other farm member server.

image

Configure the  RD Gateway farm servers to work with DSR

We’re not done yet, we need to configure our RD Gateway servers in the farm to work with DSR.

Go to Device Manager, right-click on the computer name and select Add legacy hardware

image

Click next on the welcome part of the wizard …

image

Select “Install the hardware that I manually select from a list (Advanced)” and click Next …image

Scroll down to network adapters, select it and click Next …image

Under Manufacturer choose Microsoft and as Network Adapter scroll down to Microsoft KM-TEST Loopback Adapter, select it and click Next.

image

Click Next to install it …image

image

Click next to close the Wizard.image


Now go to  and change the name so you can easily identify the loopback adapter …imageimage

In the properties of the loopback adapter we disable everything we don’t need. In this case, we only need IPV4 and nothing else. We also need to configure the TCP/IP settings for the loopback adapter. So open up the TCP/IP v4 properties of that NIC …image

Enter the IP address of the Virtual Service for UDP on the load master and, very important enter a subnet mask of 255.255.255.255 for the loopback address. It’s a subnet of 1 host, the VIP IP address. Do not enter a gateway!

image

Now go to the advanced setting and deselect Automatic metric and fill out 254. This step prevents the server to respond to ARP requests for the MAC of the VIP with the MAC of the loop back adapter.

image

Also uncheck “Register this connection”s address in DNS” to avoid any name resolution problems for the real servers.

image

Finally disable NETBIOS over TCP/IP.

image

What we are doing with all the above is preventing any issues with normal network traffic to this real servers being affected by the loopback adapter who’s one and only function is to enable DSR and nothing else. It’s a bit “paranoid” but it pays to be and prevent problems.

Dealing with Strong Host / Weak Host setting in W2K8 and higher

We now still need to deal with the strong host security model and allow the LAN interface to receive traffic from the KEMP and allow the KEMP to receive and send traffic form/to the LAN interface. This is done by executing the following commands:

netsh interface ipv4 set interface LAN weakhostreceive=enabled
netsh interface ipv4 set interface KEMP-DSR-LOOPBACK weakhostreceive=enabled
netsh interface ipv4 set interface KEMP-DSR-LOOPBACK weakhostsend=enabled

That’s it. You should now have HTTP/UDP connections in your RD Gateway monitoring when using a load balancer and set it up correctly.  Remember if this isn’t configured correctly you’ll still connect but you lose the benefits the UDP connections offer.

Now another thing you need to be aware of in your RD Gateway configuration is that for UDP  to work with DSR is that the UDP Transport Settings need to be configured for “all unassigned” IP addresses. Other wise DRS won’t work and you’ll lose UDP. This make sense, you’ll receive traffic on the VIP on your real servers. It’s just like DSR with a web server where in IIS you’ll bind both the LAN and the loopback adapter to port 80 or 443 for the site.

image

We can see that one client is connected via RDSGW01 to two servers (Viking and Spartan) leveraging HTTP and UDP. The load balancing is done via the KEMP Loadmasters in  geo-redundant fashion.

image

Yes, my geo load balanced RD Gateway Server farms are providing UDP support for the servers and clients we  RDP in to.

image

Combined with those servers and clients being spread amongst the sites provides for enough business continuity to keep the shop running when a site fails, so it’s more than just connectivity!

A highly redundant Application Delivery Controller Setup with KempTechnologies

Introduction

The goal was to make sure the KempTechnologies LoadMaster Application Delivery Controller was capable to handle the traffic to all load balanced virtual machines in a high volume data and compute environment. Needless to say the solution had to be highly available.

A highly redundant Application Delivery Controller Setup with KempTechnologies

The environment offers rack and row as failure units in power, networking and compute. Hyper-V clusters nodes are spread across racks in different rows. Networking is high to continuously available allowing for planned and unplanned maintenance as well as failure of switches. All racks have redundant PDUs that are remotely managed over Ethernet. There is a separate out of band network with remote access.

The 2 Kemp LoadMasters are mounted a different row and different rack to spread the risk and maintain high availability. Eth0 & Eth2 are in active passive bond for a redundant management interface, eth1 is used to provide a secondary backup link for HA. These use the switch independent redundant switches of the rack that also uplink (VLT) to the Force10 switches (spread across racks and rows themselves). The two 10GBps ports are in an active-passive bond to trunked ports of the two redundant switch independent 10 Gbps switches in the rack. So we also have protection against port or cable failures.

image

Some tips: Use TRUNK for the port mode, not general with DELL switches.

This design allows gives us a lot of capabilities.We have redundant networking for all networks. We have an active-passive LoadMasters which means:

  • Failover when the active on fails
  • Non service interrupting firmware upgrades
  • The rack is the failure domain. As each rack is in a different row we also mitigate “localized” issues (power, maintenance affecting the rack, …)

Combine this with the fact that these are bare metal LoadMasters (DELL R320 with iDRAC –  see Remote Access to the KEMP R320 LoadMaster (DELL) via DRAC Adds Value) we have out of band management even when we have network issues. The racks are provisioned with PDU that are managed over Ethernet so we can even cut the power remotely if needed to resolve issues.

Conclusion

The results are very good and we get “zero ping loss” failover between the LoadMaster Nodes during testing.

We have a solid, redundant Application Deliver Controller deployment that does not break the switch independent TOR setup that exists in all racks/rows. It’s active passive on the controller level and active-passive at the network (bonding) level. If that is an issue the TOR switches should be configured as MLAGs. That would enable LACP for the bonded interfaces. At the LoadMaster level these could be configured as a cluster to get an active-active setup, if some of the restrictions this imposes are not a concern to your environment.

Important Note:

Some high end switches such as the Force10 Series with VLT support attaching single homes devices (devices not attached to both members on an VLT). While VLT and MLAG are very similar MLAGs come with their own needs & restrictions. Not all switches that support MLAG can handle single homed devices. The obvious solution is no to attach single homed devices but that is not always a possibility with certain devices. That means other solutions are need which could lead to a significant rise in needed switches defeating the economics of affordable redundant TOR networking (cost of switches, power, rack space, operations, …) or by leveraging MSTP and configuring a dedicates MSTP network for a VLAN which also might not always be possible / feasible so solve the issue. Those single homed devices might very well need to be the same VLANs as the dual homed ones. Stacking would also solve the above issue as the MLAG restrictions do not apply. I do not like stacking however as it breaks the switch independent redundant network design; even during planned maintenance as a firmware upgrade brings down the entire stack.

One thing that is missing is the ability to fail over when the network fails. There is no concept of a “protected” network. This could help try mitigate issues where when a virtual service is down due to network issues the LoadMaster could try and fail over to see if we have more success on the other node. For certain scenarios this could prevent long periods of down time.