Use DNS Application Directory Partitions with conditional forwarders to resolve Azure private endpoints

Use DNS Application Directory Partitions with conditional forwarders

Before I explain how to use DNS Application Directory Partitions with conditional forwarders, we need to set the stage. We will shortly revisit how DNS name resolution is set up and configured for hybrid Azure environments. Then it will help to understand why DNS Application Directory Partitions are useful in such scenarios.

Active Directory Domain Services extended to Azure

In the context of this article, an Azure hybrid environment is where you have Active Directory Domain Services (ADDS) extended to Azure. I.e., you have a least one AD site on-premises and at least one AD Site in Azure, with connectivity between the two all set up via ExpressRoute or a Site-to-Site VPN, firewall configured, etc. In most cases, the DNS servers for the ADDS environment are AD integrated. Which is what we want for this scenario.

You must have DNS name resolution sorted out effectively and efficiently in such an environment. Queries from on-premises to Azure need to be resolved, and queries from Azure to on-premises.

Regarding resolving private endpoints in Azure and potentially other private DNS zones in Azure, we need to leverage conditional forwarders. That means we must create all the public DNS zones as conditional forwarders on the on-premises domain controllers. We point these at our custom DNS servers in Azure or our Azure Firewall DNS proxy that points to our custom DNS servers in Azure. The latter is the better option if that is available. Those custom DNS Servers will most likely be our AD/DNS server in Azure. These will forward the queries to azure VIP 168.63.129.16, which will let Azure DNS handle the actual name resolution.

Conditional forwarders on-premises

There are two attention points in this scenario. First, the conditional forwarders should only exist on the on-premises DC/DNS servers. That is normal. The DC/DNS servers in Azure can just forward the queries to the Azure VIP, which will have the AD recursive DNS service query the private DNS zones and provide an answer. That is why we forward the on-prem queries to them directly or via the firewall DNS proxy.

Secondly, less frequent, but more often than you think, ADDS on-premises does not translate into a single Azure tenant or deployment. You can have multiple AD Sites in Azure for the same on-prem ADSS environment. That happens via different business units, mergers, and acquisitions, politics, life, or whatever.

Example on-prem / Azure ADDS environment with Azure FW DNS proxy.

Both attention points mean that we must ensure that the on-prem conditional forwarders only live on the DC/DNS servers that forward to the correct custom DNS services in Azure. Some DC/DNS servers on-premises might send their queries to Azure AD site 1 and others to Azure AD site 2, which might live in separate tenants or Azure deployments.

How do we achieve this?

One option is to create the conditional forwarders without storing and replicating them to all DC/DNS servers in the forest or the domain. That works quite well, but it leaves the burden to configure them on every DC/DNS server where required. That’s OK; PowerShell is your friend. See PowerShell script to maintain Azure Public DNS zone conditional forwarders – Working Hard In ITWorking Hard In IT for a script to do that for you.

But another option might be handy if you have 10 on-premises Active Directory Sites and 5 Azure Active Directory Sites. That option is called DNS partitioning. You can create your own Active Directory partitions, To those, you add the desired DC/DNS servers. You can now create your conditional forwarders, store them in Active Directory and replicate them to their respective custom partition. That leaves the flexibility to keep the conditional forwarders out of the Azure DC/DNS servers and enables different conditional forwarders configurations per on-premises Active Directory Site.

DNS Application Directory Partitions

To create the DNS application directory partitions, you can use PowerShell or the ‘dnscnd’ command line tool. I will use Powershell here. If you want to use the command line, look at How to create and apply a custom application directory partition on an Active Directory-integrated DNS zone on how to do this.

Add-DnsServerDirectoryPartition -Name "OP-BLUE-ADDS-SITE"

The command above did two things. It created the application directory partition and registered the DNS server on which you ran the script. You can test that with Get-DnsServerDirectoryPartition -Name “OP-BLUE-ADDS-SITE” or Get-DnsServerDirectoryPartition -Name “OP-BLUE-ADDS-SITE” -ComputerName ‘DC01’ if you specify the computer name.

By the way, if you run just Get-DnsServerDirectoryPartition, you will see all partition info for the current node or the node you specify.

Register the second DC/DNS server in this partition with the following command.

Register-DnsServerDirectoryPartition -Name "OP-BLUE-ADDS-SITE" -ComputerName 'DC02'.

Register-DnsServerDirectoryPartition -Name "OP-BLUE-ADDS-SITE" -ComputerName 'DC02'.

This returns nothing by default or an error in case something is wrong. Check your handy work with the below command.

Get-DnsServerDirectoryPartition -Name "OP-BLUE-ADDS-SITE" -ComputerName 'DC02'

Note that the Get-DnsServerDirectoryPartition only shows the registered DNS server for the node you are running it on or the one you specify. You do not get a list of all registered servers.

Now go ahead and store some zones in Active Directory and replicate to the BLUE partition on one of the DC/DNS servers you will see the ZoneCount go up on both. Just wait for replication to do its job or force replication to happen.

Storing the conditional forwarder in your DNS application directory partition

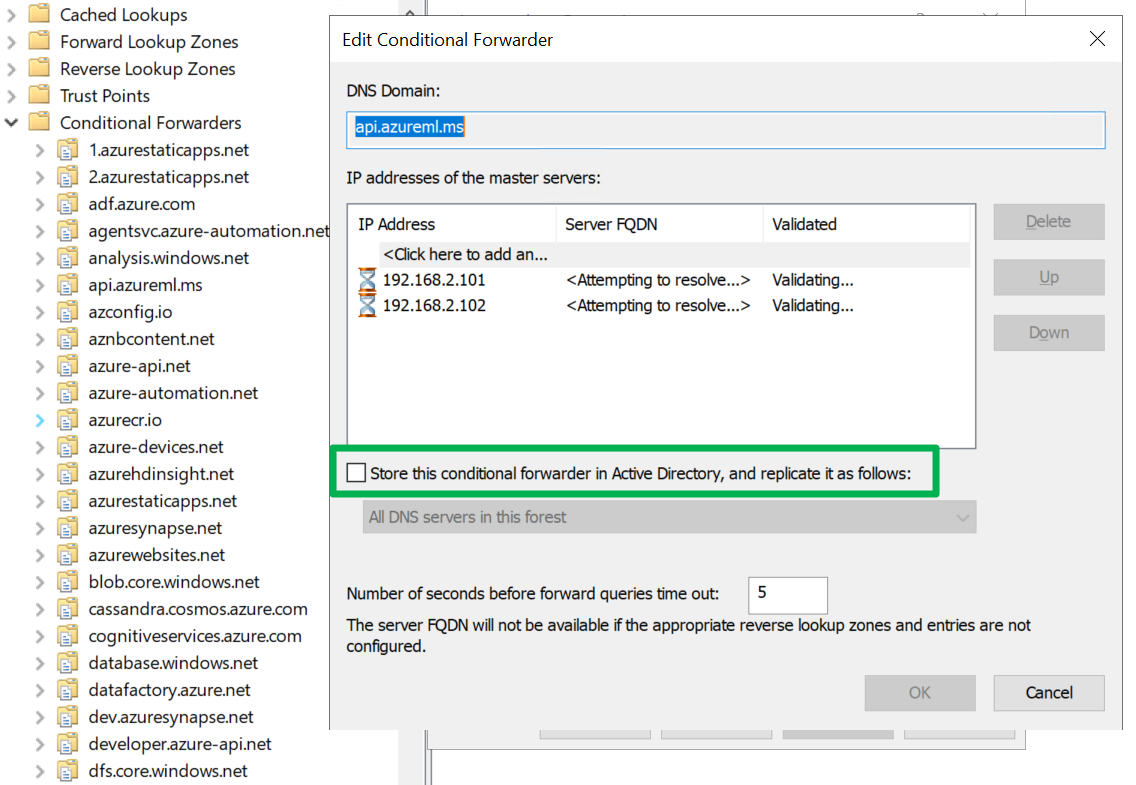
It is easy to store conditional forwarders in your custom DNS application directory partition. You can do this by adding or editing a conditional forwarding zone. However, be aware of the bug I wrote about in Bug when changing the “store this conditional forwarder in active directory” setting.

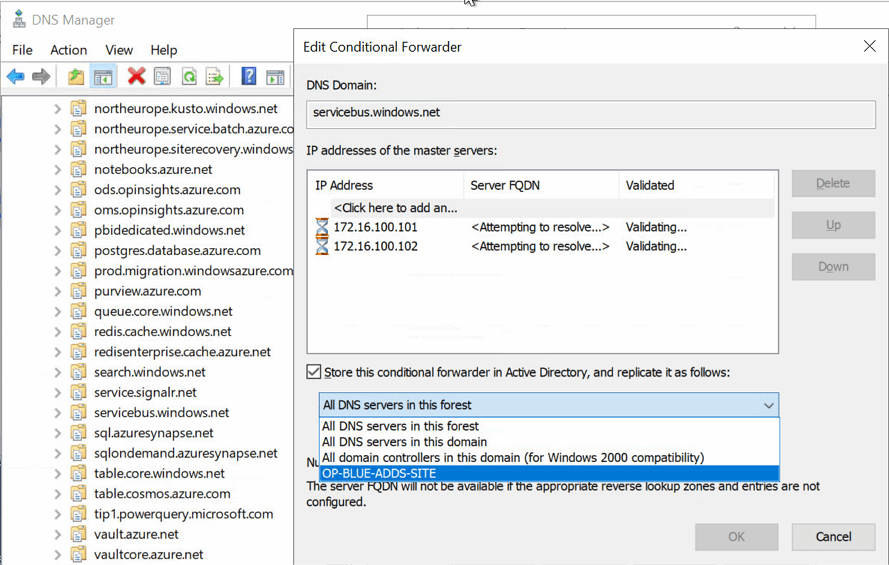
When you create the conditional forwarder zones for the private endpoints, you can store them in Active Directory and replicate them to their respective partitions. Just select the correct partition in the drop-down list. You will only see the partition for which your DC/DNS server has been registered, not every existing partition.

DNS Application Directory Partitions with conditional forwarders
Select the correct DNS application directory partition in the drop-down list

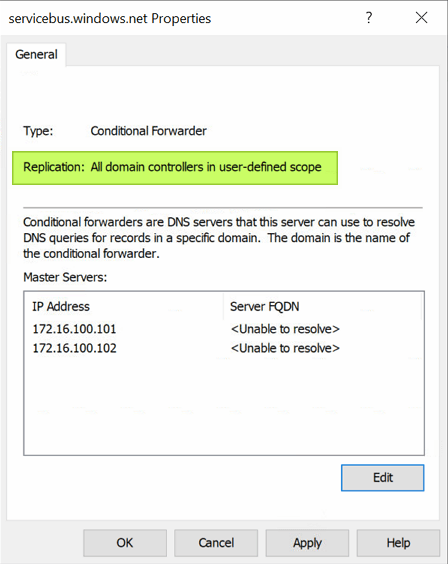
When done, the properties for the conditional forwarder will show that the zone is stored in Active Directory and replicated to all domain controllers in a user-defined scope.

DNS Application Directory Partitions with conditional forwarders
Conditional forwarder replicated to all DCs in a user-defined scope

Create a partition for any collection of DC/DNS servers that you want to have their Azure private endpoint DNS zones sent to a specific Azure deployment. So depending on your situation, that might be one or more.

As I mentioned, the custom partition will not even be offered on any DC/DNS server that has not enlisted for that zone. This protects against people selecting the wrong custom partition for their environment.

Conclusion

That’s it. You now have one more option on your tool belt when configuring on-premises to Azure name resolution in hybrid scenarios. The fun thing is that I have never seen more people learn about using DNS Application Directory Partitions with conditional forwarders now they have to design and configure DNS for hybrid on-premises/Azure ADDS environments. Maybe you learned something new today. If so, I am happy you did.

Bug when changing the “store this conditional forwarder in active directory” setting

Bug when changing the “store this conditional forwarder in active directory” setting

Recently I encountered a bug when changing the “store this conditional forwarder in active directory” setting. I have been doing quite some active directory extensions to Azure lately. Part of that, post-process, is making sure that DNS name resolution from on-premises to Azure and vice versa is working optimally. When it comes to resolving Azure private endpoints and other private DNS zones from on-premises we need to add the conditional forwarders for the respective Azure DNS zones.

As we have different needs for this configuration on-premises versus in Azure we disable “Store this conditional forwarder in Active Directory, and replicate as follows” for all zones. This is the defaultm when you add a conditional forwarder.

However, you will also need to do this, in certain cases for other conditional forwarders depending on the DNS infrastructure between Azure and on-premises. I tend to change those non-Azure resource conditional forwarders before I add the one needed for Azure.

Bug when changing the "store this conditional forwarder in active directory" setting
The “store this conditional forwarder in active directory” setting

While that sounds easy enough, you can easily get into a pickle. When you change this, while the configuration seems perfectly fine, the name resolution for those zones where you change this stops working. That is bad. No bueno!

That can break a lot of services and applications leading to support calls, causing upset application owners, and lost revenue while leaving you scrambling to find a fix.

So how do we fix this?

Well, the only solution is to remove each and every conditional forwarder involved and add them again, While re-adding it you might get an “unknown error” in the GUI, but ignore it. Just go ahead. When your reverse lookup zones are in order it will resolve to the FQDN and name resolution will start working again. You can also use PowerShell or the command line. It is worth checking if changing the setting via PowerShell or the command line triggers the bug or not.

Please note that, as your are not replication the conditional forwarders in Active Directory, you must do that on all DNS servers on-premises involved in resolving Azure resources.

Is this a known bug?

Well, it looks like it, but I have yet to find a knowledge base article about it. There are mentions of other people running into the issue. This is not per se Azure-related. Take a look here DNS Conditional Forwarder stops working as soon as it’s Domain Replicated – Microsoft Q&A and AD Integrating conditional DNS forwarders stops them working (microsoft.com).

Note that this bug when changing the “store this conditional forwarder in active directory” setting will appear when you either enable or disable it.

This bug has existed for many years and over many versions of Windows DNS. The last encounters I had was with Windows Server 2019 and 2022. But beware with Windows Server 2016 and 2012 (R2) as well.

PowerShell Script to Load Balance DNS Server Search Order

Load Balance DNS Server Search Order

DNS servers need to be configured correctly, operate perfectly and respond as fast as possible to their clients. For some applications this is critical, but many have a more relaxed attitude. Hence a DNS Server has a full second to respond to a query. That means that even when you have 2 DNS servers configured on the clients the second will only be used when the first is not available or doesn’t respond quickly enough. This has a side effect which is that moving traffic away from an overloaded DNS servers isn’t that easy or optimal. We’ll look at when to use a PowerShell script to Load balance DNS server search order.

DHCP now and then

The trick here is to balance the possible DNS servers search order amongst the clients. We used to do this via split scopes and use different DNS servers search orders in each scope. When we got Windows server 2012(R2) we not only gained policies to take care of this but also DHCP failover with replica. That’s awesome as it relieves us of much of the tedious work of keeping track of maintaining split scopes and different options on all DCHP servers involved. For more information in using the MAC addresses and DCHP policies to load balance the use of your DNS servers read this TechNet article Load balancing DNS servers using DHCP Server Policies.

Fixed IP configurations

But what about servers with fixed IP addresses? Indeed, the dream world where we’ll see dynamically assigned IP configuration everywhere is a good one but perfection is not of this world. Fixed IP configurations are still very common and often for good reasons. Some turn to DCHP reservations to achieve this but many go for static IP configuration on the servers.

image

When that’s the case, our sys admins are told the DNS servers to use. Most of the time they’ll enter those in the same order over and over again, whether they do this manual or automated. So that means that the first and second DNS server in the search order are the same everywhere. No load balancing to be found. So potentially one DNS server is doing all the work and getting slower at it while the second or third DNS servers in the search order only help out when the first one is down or doesn’t respond quickly enough anymore. Not good. When you consider many (most?) used AD integrated DNS for their MSFT environments that’s even less good.

PowerShell Script to Load Balance DNS Server Search Order

That’s why when replacing DNS Servers or seeing response time issues on AD/DNS servers I balance the DNS server search order list. I do this based on their IP address its last octet. If that’s even, DNS Server A is the first in the search order and if not it’s DNS Server B that goes in first. That mixes them up pseudo random enough.

I use a PowerShell script for that nowadays instead of my age-old VBScript one. But recently I wanted to update it to no longer use WMI calls to get the job done. That’s the script I’m sharing here, or at least the core cons pet part of it, you’ll need to turn it into a module and parameterize if further to suit your needs. The main idea is here offering an alternative to WMI calls. Do note you’ll need PowerShell remoting enabled and configured and have the more recent Windows OS versions (Windows Server 2012 and up).

cls
#The transcipt provides a log to check what was found and what changed.
Start-Transcript -Path C:\SysAdmin\MyDNSUpdateLog.txt #
$VMsOnHost = (Get-VM -ComputerName MyHyperVHostorClusterName).Name

foreach ($VM in $VMsOnHost)
{
    Invoke-Command -ComputerName $VM -ScriptBlock {

    #This function checks if the last octet of an IP address is even or not
    Function IsLastOctetEven ($IPAddress)
        {
             #$FirstIP
             $Octets = $IPAddress.Split(".")
             #$Octets[3] #0 based array, grab 4th octet

             #See if 4th octect is even
             $Boolean = [bool]!($Octets[3]%2)
             if ($Boolean)
             {
                 Return $Boolean
                 #write-host "even"
             }
             else
             {
                 Return $Boolean
                 #write-host "odd"
             }
        }

        $OldDns1 = "10.15.200.10"
        $OldDns2 = "10.15.200.11"
        $NewDns1 = "10.18.50.110"
        $NewDns2 = "10.18.50.120"

        $NicInterfaces = Get-DnsClientServerAddress

        foreach ($NICinterface in $NicInterfaces)
        {
                #Here we filter out all interfaces that are not used for client/server connectivity.
                #Cluster Interfaces, HeartBeats, Loop back adapters, ...
                #We also filter out IPv6 here as this is for a IVp4 environment.
             if($NicInterface.InterfaceAlias -notmatch "isatap" -and $NicInterface.InterfaceAlias -notmatch "Pseudo" `
                -and $NicInterface.InterfaceAlias.Contains("Local Area Connection*") -ne $True `
                -and $NicInterface.InterfaceAlias.Contains("KEMP-DSR-LOOPBACK") -ne $True `
                -and $NicInterface.InterfaceAlias.ToLower().Contains("Heartbeat".Tolower()) -ne $True `
                -and $NicInterface.InterfaceAlias.Contains("NLB-PRIVATE") -ne $True-and $NicInterface.AddressFamily -ne "23")
             {

                $Output = "Hello from  $env:computername" + $NICinterface.InterfaceAlias
                write-Output $Output            
           
                $Output = $NicInterface.InterfaceAlias +": DNS1=" + $NicInterface.ServerAddresses.GetValue(0) + " & DNS2=" +  $NicInterface.ServerAddresses.GetValue(1)
                write-Output $Output

                If (($NicInterface.ServerAddresses.GetValue(0) -like $OldDns1 -or $NicInterface.ServerAddresses.getvalue(0) -like $OldDns2) -and ($NicInterface.ServerAddresses.getvalue(1) -like $oldDns1 -or $NicInterface.ServerAddresses.getvalue(1) -like $OldDns2))
                {
                    #If the IP address is DHCP assignd, leave it alone,
                    #that's handled via DHCP policies on the MAC address
                    $GetNetIPInfo = Get-NetIpAddress -InterfaceIndex  $NicInterface.InterfaceIndex
                     if ($GetNetIPInfo.PrefixOrigin -like "DHCP")
                     {
                        $VM                   
                        write-output "DHCP address - leave it alone"
                     }
                     Else
                     {
                         $IPAddresses = $GetNetIPInfo.IPv4Address
                         $FirstIP = $IPAddresses[1] #1 based array
                 
                         if (IsLastOctetEven($FirstIP)){
                            $VM
                            write-output "EVEN 4th IP octet => so DNS search order becomes $NewDns1 , $NewDns2"
                            Set-DnsClientServerAddress -InterfaceIndex $NicInterface.InterfaceIndex -ServerAddresses ($NewDns1,$NewDns2)
                         }
                         else
                         {   
                            $VM
                            write-Output "ODD 4th IP octet => so DNS search order becomes $NewDns2 , $NewDns1"
                            Set-DnsClientServerAddress -InterfaceIndex $NicInterface.InterfaceIndex -ServerAddresses ($NewDns2, $NewDns1)
                         } 
                         $NicInterface |  Select-Object -ExpandProperty ServerAddresses    
                     }
                }
                else
                {
                    $VM
                    write-Output "Existing DNS values not like expected old values. They are propably already changed"
                }        
            }
        }
    }
}
Stop-Transcript


Easily migrating non-AD integrated DNS servers while preserving server names and IP addresses

Introduction

I’ll show you the quickest way to move an existing public advertising DNS deployment on Windows Server 2012R2, generation 1 virtual machines (1 primary DNS server and 1 or more secondary DNS Servers) to Windows 2016 RTM generation 2 VMs. On top of this we will preserve the sever names and the IP addresses. This makes the migration easier and it doesn’t burden anyone with updating IP addresses or FQDN of services pointing to the existing public advertising DNS service. Basically the result is the best possible for everyone involved.

Step by Step

We start by preparing a sysprepped VHDX of Windows 2016 with all the updates installed and any tools that are sysprep compatible and that you want or need on your VMs. This will allow us to make the move fast. As we want our new DNS VMs to be generation 2 VMS, make sure you use a generation 2 VM to create the syprepped OS VHDX.

The process we describe below is the same for each of the involved DNS servers. You start with the secondary VMs and end with the primary VM. This is just a form risk reduction, it’s smart to start with the secondary as it’s less critical than the primary where you make the changes.

Log on to the old, source VM and do the following

  1. Create a Folder to store the migration data and Info, i.e. C:\DNSMigrateServer01
  2. Open an elevated command prompt
  3. Run Ipconfig /all > C:\DNSMigrateServer01\Server01TCPIPinfo.txt this gives you the IP info you need for future reference.
  4. Run reg export HKEY_LOCAL_MACHINE\System\CurrentControlSet\Services\DNS\Parameters C:\DNSMigrateServer01\Dns-Service.REG
  5. Run reg export HKEY_LOCAL_MACHINE\SOFTWARE\Microsoft\Windows NT\CurrentVersion\DNS Server” C:\DNSMigrateServer01\Dns-Software.REG
  6. In some cases, rarely for most deployments, you’ll need to also copy all files under each custom database directory on the old DNS server by manually reading from the registry at the following path: HKEY_LOCAL_MACHINE\SYSTEM\CurrentControlSet\Services\DNS\Parameters\DatabaseDirectory If you have these also copy the directory to C:\DNSMigrateServer01. Normally when you have custom DNS database locations this is not by accident and should be well documented.
  7. Run xcopy %windir%\system32\dns C:\DNSMigrateServer01 /s This copies the content of your DNS folder (normally C:\Windows\System32\dns) to your migration folder. Note that you don’t need to copy the samples sub folder. Even the backup folder is not really needed. Just create a new backup when needed on the news DNS servers.
  8. Copy the C:\DNSMigrateServer01 from your old DNS Server to your desktop or some file share for safe keeping. You’ll need to copy this into the new DNS Server later. Note it contains your IP information, your registry exports and your DNS files.

You now have everything you need form the old DNS Server. So now we’ll decommission it, but before we do so we’ll make sure we have the options to recover it if needed.

  1. Make sure you have a backup or have made on recently (you do trust your ability to restore, right?)
  2. Shut down the VM and for good measure and fast recovery you might want to export the VM for quick import.
  3. Remove the VM from Failover Clustering if it’s clustered.
  4. Now remove the VM from Hyper-V Manager. Note this doesn’t delete the virtual disk files.
  5. Remove the old VHDX (you have an export and a backup) and replace it with your sysprepped W2K16RTM VHDX that has all the updates already. Rename that VHDX to something sensible like server01disk01.vhdx.
  6. Create a new generation 2 VM with the same name as the old one, select the required memory settings, choose to use an existing VHDX and point it to your sysprepped VHDX.
  7. Start the VM
  8. Go through the mini wizard and log in to it.
  9. Configure the NIC with the same setting as your old DNS Server
  10. Rename the VM to the old DNS VM name and join the domain.
  11. Restart the VM
  12. Login to the new DNS VM
  13. Install DNS
  14. Copy the C:\DNSMigrateServer01 you saved from your old DNS Server into the new one
  15. Open an elevated command prompt and run
    • Stop the DNS Server service by running net stop “DNS Server”
    • Double click the Dns-Service.REG and merge them into the registry

clip_image001

    • Double click the Dns-Software.REG files and merge them into the registry.

clip_image002

    • Copy all the files under C:\DNSMigrateServer01 to %windir%\System32\DNS
    • Start the DNS Server service by running net start “DNS Server”

Congratulations, you now have a new generation 2 VM running DNS on Windows Server 2016 with the same name and IP configuration as the old one. You now want to validate it’s working. To do so on the primary DNS server update the serial number in the start of authority (SOA) tab of the zone properties. I normally use YearMonthDayXX.

clip_image003

This will allow you to check whether the zone transfers to your migrated DNS server work. Normally all is just fine. In case things went horribly wrong you can import the VMs you exported or restore the backups. If your VMs are domain members and as you have reused the VM name, you’ll need to reestablish its domain member ship but that’s easily done.

Now repeat the above process for all the reaming secondary DNS Server and finally for the primary DNS server. Until you’ve done them all.

Conclusion

You do this process for every DNS Server and finally for your primary DNS server. That’s it. You’re in business and you have achieved 2 goals. You’re DNS VMs have been move to generation 2 and are running on a clean install of Windows Server 2016. All this without having to reconfigure DNS zone and transfers and while maintaining your DNS server names and IP addresses. Life is good.