Check/repair/defragment an XFS volume

Introduction

As I have started to use XFS in bite-size deployments to gain experience with it I wanted to write up some of the toolings I found to manage XFS file systems. Here’s how to check/repair/defragment an XFS volume.

My main use case for XFS volumes is on hardened Linux repositories with immutability to use with Veeam Backup & Replication v11 and higher. It’s handy to be able to find out if XFS needs repairing and if they do, repair them. Another consideration is fragmentation. You can also check that and defrag the volume.

Check XFS Volume and repair it

xfs_repair is the tool you need. You can both check if a volume needs repair and actually repair it with the same tool. Note that the use of xfs_check has been depreciated or is not even available (anymore).

To work with xfs_repair you have to unmount the filesystem, so there will be downtime. Plan for a maintenance window.

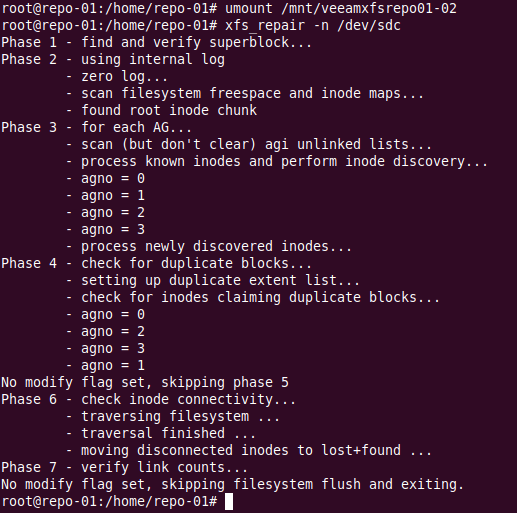
To check the file system use the -n switch

sudo xfs_repair -n /dev/sdc
Check, repair, and defragment an XFS volume
Check, repair and defragment an XFS volumea dry run with xfs_repair -n

There is nothing much to do but we’ll now let’s run the repair.

sudo xfs_repair /dev/sdc
Check, repair, and defragment an XFS volume
Repairing an XFS file system

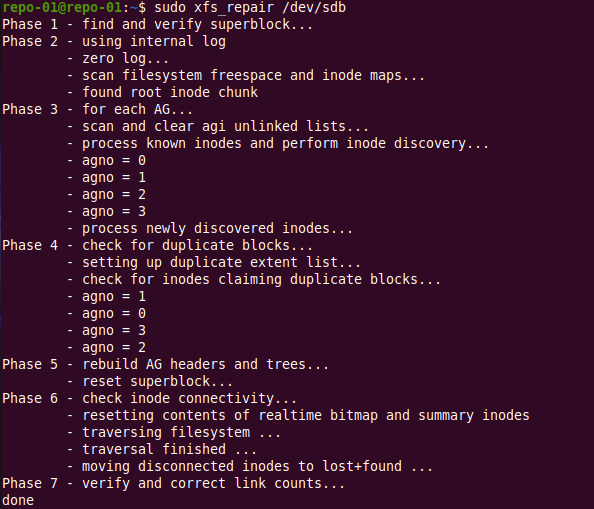
The output is similar as for the check we did for anything to repair is basically a dry run of what will be done. In this case, nothing.

Now, don’t forget to mount the file system again!

sudo mount /dev/sdc /mnt/veeamsfxrepo01-02

Check a volume for fragmentation and defrag it

Want to check the fragmentation of an XFS volume? You can but again, with xfs_db. The file system has to be unmounted for that or you will get the error xfs_db: can’t determine device size. To check for fragmentation run the following command against the storage device /file system.

sudo xfs_db -c frag -r /dev/sdc
Check, repair, and defragment an XFS volume
A lab simulation of sudo xfs_db -c frag -r /dev/sdc – Yeah know it’s meaningless 😉

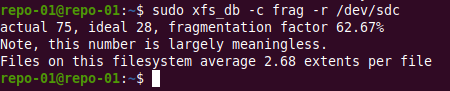
Cool, now we know that we can defrag it online. For that we use xfs_fsr.

xfs_fsr /devsdc /mnt/veeamxfsrepo01-02
Check, repair, and defragment an XFS volume
There is nothing to do in our example

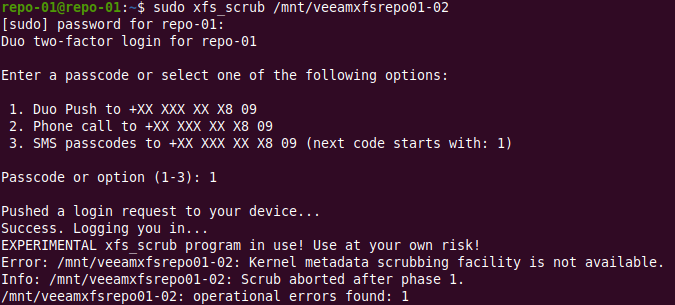
xfs_scrub – the experimental tool

xfs_scrub is a more recent addition but the program is still experimental. The good news is it will check and repair a mounted XFS filesystem. At least it sounds promising, right? It does, but it doesn’t work (Ubuntu 20.04.1 LTS).

No joy – still a confirmed bug – not assigned yet, importance undecided. Not yet my friends.

Conclusion

That’s it. I hope this helps you when you decide to take XFS for a spin for your storage needs knowing a bit more about the tooling. As said, for me, the main use case is hardened Linux repositories with immutability to use with Veeam Backup & Replication v11. In a Hyper-V environment of course.

Hyper-V Virtual Machines and the Storage Optimizer

Windows Server 2012 (R2) has made many improvements to how storage optimization and maintenance is done. You can read a lot more about this in What’s New in Defrag for Windows Server 2012/2012R2. It boils down to a more intelligent approach depending on the capability of the underlying storage.

This is reflected in the Media type we see when we look at Optimize Drives.

This is my workstation … looks pretty correct a couple of SSDs and a couple of HDDs.

image

SSD are optimized intelligently by the way.When VSS is leveraged SSD do get fragmentation and so one in while they are “defragmented”. This has to do with keeping performance up to par. Read more about this in The real and complete story – Does Windows defragment your SSD? by Scott Hanselman.

The next example is a Hyper-V Cluster. You can see the local disks identified as HDD and the CSV as Thin provisioned disks. Makes sense to me, the SAN I use supports thin provisioned disks.

image

But now, let’s look at a Virtual Machine with virtual disks of every type known and on any type of storage we could find. All virtual disks are identified as “Thin provisioned disk”. How can that be?

image

What had me puzzled a little bit is that in a virtual machine each and every virtual disk is identified as thin provisioned disk. It doesn’t matter what type of virtual disk it is: fixed VHD/VHDX or dynamically expanding VHD/VHDX. It also doesn’t matter on what physical disk the virtual disk resides: SATA, SAS, SSD, SAN (iSCSI/FC) LUN or CSV, SMB Share …

So how does this work with a fixed VHD on a local SATA disk? A VHD doesn’t know about UNMAP, does it? And a SATA HHD? How does that compute? Well, my understanding on this is that all virtual disks, dynamically expanding or fixed, both VHDX/VHD are identified as thin provisioned disks, no matter what type of physical disk they reside on (CSV, SAS, SATA, SSD, shared/non shared). This is to allow for UNMAP (RETRIMs in Storage Optimizer speak, which is  way of dealing with the TRIM limitations / imperfections, again see Scott Hanselman’s blog for this) command to be sent from the guest to the Hyper-V storage stack below. If it’s a VHD those UNMAP command are basically black holed just like they would never be passed down to a local SATA HHD (on the host) that has no idea what it is and used for.

But wait a minute ….what about SSD and defragmentation you say, my VHDX lives on an SSD.. Well they are for one not identified as SSD or HDD. The hypervisors deals with the storage optimization at the virtual layer. The host OS handles the physical layer as intelligent as it can to optimize the disks as best as it can. How that happens depends on the actual storage beneath in the case of a modern SAN you’ll notice it’s also identified as a Thin provisioned disk. SANs or hyper converged storage arrays provide you with storage that is also virtual with all kinds of features and are often based on tier storage which will be a mix of SSD/SAS/NL-SAS and in some cases even NVMe Flash. So what would an OS have to identify it as?  The storage array must play its part in this.

So, if you ever wondered why that is, now you know. Hope you found this interesting!

Hyper-V and Disk Fragmentation

There are 3 type of disk fragmentation you might need to deal with in regards to Hyper-V:

  1. Fragmentation of the file system on the host LUN where the VMs reside.
  2. Fragmentation of files system on the LUNs inside of the VM.
  3. Block fragmentation of the VHDX itself. This is potentially more of an issue with dynamic disks and differencing disks.

We deal with the first type by defragmenting the LUN, which might be a CSV, in which case you can take a look here for more information on this Defragmenting your CSV Windows 2012 R2 Style with Raxco Perfect Disk 13 SP2.  For more information on fragmentation in general take a look here What’s New in Defrag for Windows Server 2012/2012R. The second type is business as usual and is similar to the first one except that it’s the file system inside a VM.

For the third type we need to create a new virtual disk using the fragmented one as the source. See Checking and Correcting Virtual Hard Disk Fragmentation. This easily done but it does cause down time unless you leverage storage live migration. So that’s my preferred method, especially as I leverage ODX when I do this, so it’s pretty fast. So always leave yourself some margin on storage to be able to perform maintenance operations. That has always been true and still is.

But how do you find out that you have this issue? PowerShell is your friend! Here’s a snippet to show you can check all VMs their vhdx files on a cluster:

$AllVMsOnAllNodesInCluster = Get-VM -ComputerName (get-ClusterNode)
ForEach ($VM in $AllVMsOnAllNodesIncluster)
{
    $VM.Name
    #$HardDrives  = $VM.HardDrives
    invoke-command -ComputerName $VM.computername -ScriptBlock {
        param ($VM)
        Get-VM -Name $VM.Name | Get-VMHardDiskDrive | Get-VHD | ft path, fragmentationpercentage -AutoSize
    } -arg $VM
}

Here’s a screenshot of some output of this snippet

image

As said the best solution that does not incur down time is to storage (live) migrate the virtual disks affected. We can automate this and put in some logic to do this for all virtual hard disks that are more than X% fragmented. Do take care to also check for disk space or the migration will fail.

Hope this helps some of you!

Defragmenting your CSV Windows 2012 R2 Style with Raxco Perfect Disk 13 SP2

When it comes to defragmenting CSV it seemed we took a step back when it comes to support from 3rd party vendors. While Windows provides for a great toolset to defragment a CSV it seemed to have disappeared form 3r party vendor software. Even from the really good Raxco Perfect disk. They did have support for this with Windows 2008 R2 and I even mentioned that in a blog.

If you need information on how to defragment a CSV in Windows 2012 R2, look no further.There is an absolutely fantastic blog post on the subject How to Run ChkDsk and Defrag on Cluster Shared Volumes in Windows Server 2012 R2, by Subhasish Bhattacharya one of the program managers in the Clustering and High Availability product group. He’s a great guy to talk shop to by the way if you ever get the opportunity to do so. One bizarre thing is that this must be the only place where PowerShell (Repair-ClusterSharedVolume cmdlet) is depreciated in lieu of chkdsk.

3rd party wise the release of Raxco Perfect Disk 13 SP2 brought back support for defragmenting CSV.

image

I don’t know why it took them so long but the support is here now. It looks like they struggled to get the CSVFS (the way CSV are now done since Windows Server 2012) supported. Whilst add it, they threw in support for ReFS by the way. This is the first time I’ve ever seen this. Any way it’s here and that’s good because I have a hard time accepting that any product (whatever it does) supports Hyper-V if it can’t handle CSV, not if you want to be taken seriously anyway. No CSV support equals = do not buy list in my book.

Here’s a screenshot of Perfect disk defragmenting away. One of the CSV LUNs in my lab is a SSD and the other a HDD.

image

Notice that in Global Settings you can tweak the behavior when defragmenting optimization of various drive types, including CSVFS but you just have to leave the default on unless you like manual labor or love PowerShell that much you can’t forgo any opportunity to use it Winking smile

image

Perfect disk cannot detect what kind of disks you have behind the CSV LUN so you might want to change the optimization method if you’re running SSD instead of HHD.

image

I’d love for Raxco to comment on this or point to some guidance.

What would also be beneficial to a lot of customers is guidance on defragmentation on the different auto-tiering storage arrays. That would make for a fine discussion I think.