Altaro Free Webinar: What’s New in Windows Server 2019

Altaro Free Webcast: What’s New in Windows Server 2019

Altaro software is running a free webinar: what’s New in Windows Server 2019. The timing, October the 3rd, could not be better as Microsoft Ignite lies right behind us and we can all use some help in putting that barrage of announcements in to context. That help is here and offered by industry experts like Andy Syrewicze, Rob Corradini and Symon Perriman.

So register here an get some insights, views and guidance from industry experts on the value of Windows Server 2019 and what this means to so many of us in the IT field. As our industry is changing and new balances are found, let me say that Windows Server 2019 will play a significant role in the next years building the future of IT.

image

My take

The industries I advise know I advocate Serverless, containers and servers as well as PAAS & SAAS. My strength lies in the fact I know the IT stack. Compute, storage, memory and networks. I started my career developing code and as such I know code needs an excellent environment to run it so it can shine. I also know I don’t know a lot. So I’m active in the community,  attend conferences, listen and learn from other peoples and vendors their point of view and insights. You must avoid tunnel vision and echo chambers. But you also must grasp your own industry and business in order to make decisions and move ahead.

Observe, orient, decide and act in a never ending cycle. So register or Altaro’s free webinar: what’s New in Windows Server 2019 and get a head start in this process. I have registered and intent to attend unless work priorities prevent me from doing so. I most certainly hope not! See you there. Register here. It.s free, all you got to do is show up and invest some time in your own future.

Live Migration Fails due to non-existent SharedStoragePath or ConfigStoreRootPath

Introduction

I was tasked to troubleshoot a cluster where cluster aware updating (CAU) failed due to the nodes never succeeding going into maintenance mode. It seemed that none of the obvious or well know issues and mistakes that might break live migrations were present. Looking at the cluster and testing live migration not a single VM on any node would live migrate to any other node.
So, I take a peek the event id and description and it hits me. I have seen this particular event id before.

Live Migration Fails due to non-existent SharedStoragePath or ConfigStoreRootPath

Log Name:      System
Source:        Microsoft-Windows-Hyper-V-High-Availability
Date:          9/27/2018 15:36:44
Event ID:      21502
Task Category: None
Level:         Error
Keywords:
User:          SYSTEM
Computer:      NODE-B.datawisetech.corp
Description:
Live migration of ‘Virtual Machine ADFS1’ failed.
Virtual machine migration operation for ‘ADFS1’ failed at migration source ‘NODE-B’. (Virtual machine ID 4B5F2F6C-AEA3-4C7B-8342-E255D1D112D7)
Failed to verify collection registry for virtual machine ‘ADFS1’: The system cannot find the file specified. (0x80070002). (Virtual Machine ID 4B5F2F6C-AEA3-4C7B-8342-E255D1D112D7).
The live migration fails due to non-existent SharedStoragePath or ConfigStoreRootPath which is where collections metadata lives.

More errors are logged

There usually are more related tell-tale events. They however are clear in pin pointing the root cause.

On the destination host

On the destination host you’ll find event id 21066:

Log Name:      Microsoft-Windows-Hyper-V-VMMS-Admin
Source:        Microsoft-Windows-Hyper-V-VMMS
Date:          9/27/2018 15:36:45
Event ID:      21066
Task Category: None
Level:         Error
Keywords:
User:          SYSTEM
Computer:      NODE-A.datawisetech.corp
Description:
Failed to verify collection registry for virtual machine ‘ADFS1’: The system cannot find the file specified. (0x80070002). (Virtual Machine ID 4B5F2F6C-AEA3-4C7B-8342-E255D1D112D7).

A bunch of 1106 events per failed live migration per VM in like below:

Log Name:      Microsoft-Windows-Hyper-V-VMMS-Operational
Source:        Microsoft-Windows-Hyper-V-VMMS
Date:          9/27/2018 15:36:45
Event ID:      1106
Task Category: None
Level:         Error
Keywords:
User:          SYSTEM
Computer:      NODE-A.datawisetech.corp
Description:
vm\service\migration\vmmsvmmigrationdestinationtask.cpp(5617)\vmms.exe!00007FF77D2171A4: (caller: 00007FF77D214A5D) Exception(998) tid(1fa0) 80070002 The system cannot find the file specified.

On the source host

On the source host you’ll find event id 1840 logged
Log Name:      Microsoft-Windows-Hyper-V-Worker-Operational
Source:        Microsoft-Windows-Hyper-V-Worker
Date:          9/27/2018 15:36:44
Event ID:      1840
Task Category: None
Level:         Error
Keywords:
User:          NT VIRTUAL MACHINE\4B5F2F6C-AEA3-4C7B-8342-E255D1D112D7
Computer:      NODE-B.datawisetech.corp
Description:
[Virtual machine 4B5F2F6C-AEA3-4C7B-8342-E255D1D112D7] onecore\vm\worker\migration\workertaskmigrationsource.cpp(281)\vmwp.exe!00007FF6E7C46141: (caller: 00007FF6E7B8957D) Exception(2) tid(ff4) 80042001     CallContext:[\SourceMigrationTask]

As well as event id 21111:
Log Name:      Microsoft-Windows-Hyper-V-High-Availability-Admin
Source:        Microsoft-Windows-Hyper-V-High-Availability
Date:          9/27/2018 15:36:44
Event ID:      21111
Task Category: None
Level:         Error
Keywords:
User:          SYSTEM
Computer:      NODE-B.datawisetech.corp
Description:
Live migration of ‘Virtual Machine ADFS1’ failed.

… event id 21066:
Log Name:      Microsoft-Windows-Hyper-V-VMMS-Admin
Source:        Microsoft-Windows-Hyper-V-VMMS
Date:          9/27/2018 15:36:44
Event ID:      21066
Task Category: None
Level:         Error
Keywords:
User:          SYSTEM
Computer:      NODE-B.datawisetech.corp
Description:
Failed to verify collection registry for virtual machine ‘ADFS1’: The system cannot find the file specified. (0x80070002). (Virtual Machine ID 4B5F2F6C-AEA3-4C7B-8342-E255D1D112D7).

… and event id 21024:
Log Name:      Microsoft-Windows-Hyper-V-VMMS-Admin
Source:        Microsoft-Windows-Hyper-V-VMMS
Date:          9/27/2018 15:36:44
Event ID:      21024
Task Category: None
Level:         Error
Keywords:
User:          SYSTEM
Computer:      NODE-B.datawisetech.corp
Description:
Virtual machine migration operation for ‘ADFS1’ failed at migration source ‘NODE-B’. (Virtual machine ID 4B5F2F6C-AEA3-4C7B-8342-E255D1D112D7)

Live migration fails due to non-existent SharedStoragePath or ConfigStoreRootPath explained

If you have worked with guest clusters and the ConfigStoreRootPath you know about issues with collections/ groups & checkpoints. This is related to those. If you haven’t heard anything yet read https://blog.workinghardinit.work/2018/09/10/correcting-the-permissions-on-the-folder-with-vhds-files-checkpoints-for-host-level-hyper-v-guest-cluster-backups/.

This is what a Windows Server 2016/2019 cluster that has not been configured with a looks like.

Get-VMHostCluster  -ClusterName “W2K19-LAB”

image

HKLM\Cluster\Resources\GUIDofWMIResource\Parameters there is a value called ConfigStoreRootPath which in PowerShell is know as the SharedStoragePath property.  You can also query it via

And this is what it looks like in the registry (0.Cluster and Cluster keys.) The resource ID we are looking at is the one of the Virtual Machine Cluster WMI resource.

image

If it returns a path you must verify that it exists, if not you’re in trouble with live migrations. You will also be in trouble with host level guest cluster backups or Hyper-V replicas of them. Maybe you don’t have guest cluster or use in guest backups and this is just a remnant of trying them out.

When I run it on the problematic cluster I get a path points to a folder on a CSV that doesn’t exist.

Get-VMHostCluster -ClusterName “W2K19-LAB
ClusterName SharedStoragePath
———– —————–
W2K19-LAB   C:\ClusterStorage\ReFS-01\SharedStoragePath

What happend?

Did they rename the CSV? Replace the storage array? Well as it turned out they reorganized and resized the CSVs. As they can’t shrink SAN LUNs the created new ones. They then leveraged storage live migration to move the VMs.

The old CSV’s where left in place for about 6 weeks before they were cleaned up. As this was the first time they ran Cluster Aware Updating after removing them this is the first time they hit this problem. Bingo! You probably think you’ll just change it to an existing CSV folder path or delete it. Well as it turns out, you cannot do that. You can try …

PS C:\Users\administrator1> Set-VMHostCluster -ClusterName “W2K19-LAB” -SharedStoragePath “C:\ClusterStorage\Volume1\SharedStoragePath”

Set-VMHostCluster : The operation on computer ‘W2K19-LAB’ failed: The WS-Management service cannot process the request. The WMI service or the WMI provider returned an unknown error: HRESULT 0x80070032
At line:1 char:1
+ Set-VMHostCluster -ClusterName
“W2K19-LAB” -SharedStoragePath “C:\Clu …
+ ~~~~~~~~~~~~~~~~~~~~~~~~~~~~~~~~~~~~~~~~~~~~~~~~~~~~~~~~~~~~~~~~~~~~~
+ CategoryInfo          : NotSpecified: (:) [Set-VMHostCluster], VirtualizationException
+ FullyQualifiedErrorId : OperationFailed,Microsoft.HyperV.PowerShell.Commands.SetVMHostCluster

Or try …
$path = “C:\ClusterStorage\Volume1\Hyper-V\Shared”
Get-ClusterResource “Virtual Machine Cluster WMI” | Set-ClusterParameter -Name ConfigStoreRootPath -Value $path -Create

Whatever you try, deleting, overwriting, … no joy. As it turns out you cannot change it and this is by design. A shaky design I would say. I understand the reasons because if it changes or is deleted and you have guest clusters with collection depending on what’s in there you have backup and live migration issues with the guest clusters. But if you can’t change it you also run into issues if storage changes. You dammed if you do, dammed if you don’t.

Workaround 1

What

Create a CSV with the old name and folder(s) to which the current path is pointing. That works. It could even be a very small one. As test I use done of 1GB. Not sure of that’s enough over time but if you can easily extend your CSV that’s should not pose a problem. It might actually be a good idea to have this as a best practice. Have a dedicated CSV for the SharedStoragePath. I’ll need to ask Microsoft.

How

You know how to create a CSV and a folder I guess, that’s about it.  I’ll leave it at that.

Workaround 2

What

Set the path to a new one in the registry. This could be a new path (mind you this won’t fix any problems you might already have now with existing guest clusters).

Delete the value for that current path and leave it empty. This one is only a good idea if you don’t have a need for VHD Set Guest clusters anymore. Basically, this is resetting it to the default value.

How

There are 2 ways to do this. Both cost down time. You need to bring the cluster service down on all nodes and then you don’t have your CSV’s. That means your VMs must be shut down on all nodes of the cluster

The Microsoft Support way

Well that’s what they make you do (which doesn’t mean you should just do it even without them instructing you to do so)

  1. Export your HKLM\Cluster\Resources\GUIDofWMIResource\Parameters for save keeping and restore if needed.
  2. Shut down all VMs in the cluster or even the ones residing on a CSV even if not clusterd.
  3. Stop the cluster service on all nodes (the cluster is shutdown if you do that), leave the one you are working on for last.
  4. From one node, open up the registry key
  5. Click on HKEY_LOCAL_MACHINE and then click on file, then select load hive
  6. Browse to c:\windows\cluster, and select CLUSDB
  7. Click ok, and then name it DB
  8. Expand DB, then expand Resources
  9. Select the GUID of Virtual Machine WMI
  10. Click on parameters, on (configStoreRootPath) you will find the value
  11. Double click on it, and delete it or set it to a new path on a CSV that you created already
  12. Start the cluster service
  13. Then start the cluster service from all nodes, node by node

My way

Not supported, at your own risk, big boy rules apply. I have tried and tested this a dozen times in the lab on multiple clusters and this also works.

  1. In the registry key Cluster (HKLM\Cluster\Resources\GUIDofWMIResource\Parameters) of ever cluster node delete the content of the REGZ value for configStoreRootPath, so it is empty or change it to a new path on a CSV that you created already for this purpose.
  2. If you have a cluster with a disk witness, the node who owns the disk witness also has a 0.Cluster key (HKLM\0.Cluster\Resources\GUIDofWMIResource\Parameters). Make sure you also to change the value there.
  3. When you have done this. You have to shut down all the virtual machines. You then stop the cluster service on every node. I try to work on the node owning the disk witness and shut down the cluster on that one as the final step. This is also the one where I start again the cluster again first so I can easily check that the value remains empty in both the Cluster and the 0.Cluster keys. Do note that with a file share / cloud share witness, knowing what node was shut down last can be important. See https://blog.workinghardinit.work/2017/12/11/cluster-shared-volumes-without-active-directory/. That’s why I always remember what node I’m working on and shut down last.
  4. Start up the cluster service on the other nodes one by one.
  5. This avoids having to load the registry hive but editing the registry on every node in large clusters is tedious. Sure, this can be scripted in combination with shutting down the VMs, stopping the cluster service on all nodes, changing the value and then starting the cluster services again as well as the VMs. You can control the order in which you go through the nodes in a script as well. I actually did script this but I used my method. you can find it at the bottom of this blog post.

Both methods will work and live migrations will work again. Any existing problematic guest cluster VMs in backup or live migration is food for another blog post perhaps. But you’ll have things like driving your crazy.

Some considerations

Workaround 1 is a bit of a “you got to be kidding me” solution but at least it leaves some freedom replace, rename, reorganize the other CSVs as you see fit. So perhaps having a dedicated CSV just for this purpose is not that silly. Another benefit is that this does not involve messing around in the cluster database via the registry. This is something we advise against all the time but now has become a way to get out of a pickle.

Workaround 2 speaks for its self. There is two ways to achieve this which I have shown. But a word of warning. The moment the path changes and you have some already existing VHD Set guests clusters that somehow depend on that you’ll see that backups start having issues and possibly even live migrations. But you’re toast for all your Live migrations anyway already so … well yeah, what can I do.

So, this is by design. Maybe it is but it isn’t very realistic that your stuck to a path and name that hard and that it causes this much grief or allows for people to shoot themselves in the foot. It’s not like all this documented somewhere.

Conclusion

This needs to be fixed. While I can get you out of this pickle it is a tedious operation with some risk in a production environment. It also requires down time, which is bad. On top of that it will only have a satisfying result if you don’t have any VHD Set guest clusters that rely on the old path. The mechanism behind the SharedStoragePath isn’t as robust and flexible yet as it should be when it comes to changes & dealing with failed host level guest cluster backups.

I have tested this in Windows 2019 insider preview. The issue is still there. No progress on that front. Maybe in some of the future cumulative updates, things will be fixed to make guest clustering with VHD Set a more robust and reliable solution. The fact that Microsoft relies on guest clustering to support some deployment scenarios with S2D makes this even more disappointing. It is also a reason I still run physical shared storage-based file clusters.

The problematic host level backups I can work around by leveraging in guest backups. But the path issue is unavoidable if changes are needed.

After 2 years of trouble with the framework around guest cluster backups / VHD Set, it’s time this “just works”. No one will use it when it remains this troublesome and you won’t fix this if no one uses this. The perfect catch 22 situation.

The Script

$ClusterName = "W2K19-LAB"
$OwnerNodeWitnessDisk = $Null
$RemberLastNodeThatWasShutdown = $Null
$LogFileName = "ConfigStoreRootPathChange"

$RegistryPathCluster = "HKLM:\Cluster\Resources\$WMIClusterResourceID\Parameters"
$RegistryPathClusterDotZero = "HKLM:\0.Cluster\Resources\$WMIClusterResourceID\Parameters"
$REGZValueName = "ConfigStoreRootPath" 
$REGZValue = $Null #We need to empty the value
#$REGZValue = "C:\ClusterStorage\ReFS-01\SharedPath" #We need to set a new path.

#Region SupportingFunctionsAndWorkFlows
Workflow ShutDownVMs {
    param ($AllVMs)
    
    Foreach -parallel ($VM in $AllVMs) {
        InlineScript {
            try {
                If ($using:VM.State -eq "Running") {
                    Stop-VM -Name $using:VM.Name -ComputerName $using:VM.ComputerName -force 
                } 
            }
            catch {
                $ErrorMessage = $_.Exception.Message
                $ErrorLine = $_.InvocationInfo.Line
                $ExceptionInner = $_.Exception.InnerException
                Write-2-Log -Message "!Error occured!:" -Severity Error
                Write-2-Log -Message $ErrorMessage -Severity Error
                Write-2-Log -Message $ExceptionInner -Severity Error
                Write-2-Log -Message $ErrorLine -Severity Error
                Write-2-Log -Message "Bailing out - Script execution stopped" -Severity Error
            }
        }
    }
}

#Code to shut down all VMs on all Hyper-V cluster nodes
Workflow StartVMs {
    param ($AllVMs)
    Foreach -parallel ($VM in $AllVMs) {
        InlineScript {
            try {
                if ($using:VM.State -eq "Off") {
                    Start-VM -Name $using:VM.Name -ComputerName $using:VM.ComputerName 
                }
            }
            catch {
                $ErrorMessage = $_.Exception.Message
                $ErrorLine = $_.InvocationInfo.Line
                $ExceptionInner = $_.Exception.InnerException
                Write-2-Log -Message "!Error occured!:" -Severity Error
                Write-2-Log -Message $ErrorMessage -Severity Error
                Write-2-Log -Message $ExceptionInner -Severity Error
                Write-2-Log -Message $ErrorLine -Severity Error
                Write-2-Log -Message "Bailing out - Script execution stopped" -Severity Error
            }
        }
    }
}
function Write-2-Log {
    [CmdletBinding()]
    param(
        [Parameter()]
        [ValidateNotNullOrEmpty()]
        [string]$Message,
        [Parameter()]
        [ValidateNotNullOrEmpty()]
        [ValidateSet('Information', 'Warning', 'Error')]
        [string]$Severity = 'Information'
    )
 
    $Date = get-date -format "yyyyMMdd"
    [pscustomobject]@{
        Time     = (Get-Date -f g)
        Message  = $Message
        Severity = $Severity
        
    } | Export-Csv -Path "$PSScriptRoot\$LogFileName$Date.log" -Append -NoTypeInformation
}


#endregion

Try {
    Write-2-Log -Message "Connecting to cluster $ClusterName" -Severity Information
    $MyCluster = Get-Cluster -Name $ClusterName
    $WMIClusterResource = Get-ClusterResource "Virtual Machine Cluster WMI" -Cluster $MyCluster
    Write-2-Log -Message "Grabbing Cluster Resource: Virtual Machine Cluster WMI" -Severity Information
    $WMIClusterResourceID = $WMIClusterResource.Id
    Write-2-Log -Message "The Cluster Resource Virtual Machine Cluster WMI ID is $WMIClusterResourceID " -Severity Information
    Write-2-Log -Message "Checking for quorum config (disk, file share / cloud witness) on $ClusterName" -Severity Information

    If ((Get-ClusterQuorum -Cluster $MyCluster).QuorumResource -eq "Witness") {
        Write-2-Log -Message "Disk witness in use. Lookin up for owner node of witness disk as that holds the 0.Cluster registry key" -Severity Information
        #Store the current owner node of the witness disk.
        $OwnerNodeWitnessDisk = (Get-ClusterGroup -Name "Cluster Group").OwnerNode 
        Write-2-Log -Message "Owner node of witness disk is $OwnerNodeWitnessDisk" -Severity Information
    }
}
Catch {
    $ErrorMessage = $_.Exception.Message
    $ErrorLine = $_.InvocationInfo.Line
    $ExceptionInner = $_.Exception.InnerException
    Write-2-Log -Message "!Error occured!:" -Severity Error
    Write-2-Log -Message $ErrorMessage -Severity Error
    Write-2-Log -Message $ExceptionInner -Severity Error
    Write-2-Log -Message $ErrorLine -Severity Error
    Write-2-Log -Message "Bailing out - Script execution stopped" -Severity Error
    Break
}

try {
    $ClusterNodes = $MyCluster | Get-ClusterNode
    Write-2-Log -Message "We have grabbed the cluster nodes $ClusterNodes from $MyCluster" -Severity Information

    Foreach ($ClusterNode in $ClusterNodes) {
        #If we have a disk witness we also need to change the in te 0.Cluster registry key on the current witness disk owner node.
        If ($ClusterNode.Name -eq $OwnerNodeWitnessDisk) {
            if (Test-Path -Path $RegistryPathClusterDotZero) {
                Write-2-Log -Message "Changing $REGZValueName in 0.Cluster key on $OwnerNodeWitnessDisk who owns the witnessdisk to $REGZvalue" -Severity Information
                Invoke-command -computername $ClusterNode.Name -ArgumentList $RegistryPathClusterDotZero, $REGZValueName, $REGZValue {
                    param($RegistryPathClusterDotZero, $REGZValueName, $REGZValue)
                    Set-ItemProperty -Path $RegistryPathClusterDotZero -Name $REGZValueName -Value $REGZValue -Force | Out-Null}
            }
        }
        if (Test-Path -Path $RegistryPathCluster) {
            Write-2-Log -Message "Changing $REGZValueName in Cluster key on $ClusterNode.Name to $REGZvalue" -Severity Information
            Invoke-command -computername $ClusterNode.Name -ArgumentList $RegistryPathCluster, $REGZValueName, $REGZValue {
                param($RegistryPathCluster, $REGZValueName, $REGZValue)
                Set-ItemProperty -Path $RegistryPathCluster -Name $REGZValueName -Value $REGZValue -Force | Out-Null}
        }
    }

    Write-2-Log -Message "Grabbing all VMs on all clusternodes to shut down" -Severity Information
    $AllVMs = Get-VM –ComputerName ($ClusterNodes)
    Write-2-Log -Message "We are shutting down all running VMs" -Severity Information
    ShutdownVMs $AllVMs
}

catch {
    $ErrorMessage = $_.Exception.Message
    $ErrorLine = $_.InvocationInfo.Line
    $ExceptionInner = $_.Exception.InnerException
    Write-2-Log -Message "!Error occured!:" -Severity Error
    Write-2-Log -Message $ErrorMessage -Severity Error
    Write-2-Log -Message $ExceptionInner -Severity Error
    Write-2-Log -Message $ErrorLine -Severity Error
    Write-2-Log -Message "Bailing out - Script execution stopped" -Severity Error
    Break
}

try {
    #Code to stop the cluster service on all cluster nodes
    #ending with the witness owner if there is one
    Write-2-Log -Message "Shutting down cluster service on all nodes in $MyCluster that are not the owner of the witness disk" -Severity Information
    Foreach ($ClusterNode in $ClusterNodes) {
        #First we shut down all nodes that do NOT own the witness disk
    
        If ($ClusterNode.Name -ne $OwnerNodeWitnessDisk) {
            Write-2-Log -Message "Stop cluster service on node $ClusterNode.Name" -Severity Information
            if ((Get-ClusterNode -Cluster W2K19-LAB | where-object {$_.State -eq "Up"}).count -ne 1) {
                Stop-ClusterNode -Name $ClusterNode.Name -Cluster $MyCluster | Out-Null
            }
            Else {
                Stop-Cluster -Cluster $MyCluster -Force | Out-Null
                $RemberLastNodeThatWasShutdown = $ClusterNode.Name
            }
        }
    }
    #Whe then shut down the nodes that owns the witness disk
    #If we have a fileshare etc,  this won't do anything.
    Foreach ($ClusterNode in $ClusterNodes) {
        If ($ClusterNode.Name -eq $OwnerNodeWitnessDisk) {
            Write-2-Log -Message "Stopping cluster and as such last node $ClusterNode.Name" -Severity Information
            Stop-Cluster -Cluster $MyCluster -Force | Out-Null
            $RemberLastNodeThatWasShutdown = $OwnerNodeWitnessDisk
        }
    }  
    #Code to start the cluster service on all cluster nodes,
    #starting with the original owner of the witness disk
    #or the one that was shut down last


    Foreach ($ClusterNode in $ClusterNodes) {
        #First we start the node that was shut down last. This is either the one that owned the witness disk
        #or just the last node that was shut down in case of a fileshare
        If ($ClusterNode.Name -eq $RemberLastNodeThatWasShutdown) {
            Write-2-Log -Message "Starting the clusternode $ClusterNode.Name that was the last to shut down" -Severity Information
            Start-ClusterNode -Name $ClusterNode.Name -Cluster $MyCluster | Out-Null
        }           
    }

    Write-2-Log -Message "Starting the all other clusternodes in $MyCluster" -Severity Information
    Foreach ($ClusterNode in $ClusterNodes) {
        #We then start all the other nodes in the cluster.     
        If ($ClusterNode.Name -ne $RemberLastNodeThatWasShutdown) {
            Write-2-Log -Message "Starting the clusternode $ClusterNode.Name" -Severity Information
            Start-ClusterNode -Name $ClusterNode.Name -Cluster $MyCluster | Out-Null
        }
    }
}

catch {
    $ErrorMessage = $_.Exception.Message
    $ErrorLine = $_.InvocationInfo.Line
    $ExceptionInner = $_.Exception.InnerException
    Write-2-Log -Message "!Error occured!:" -Severity Error
    Write-2-Log -Message $ErrorMessage -Severity Error
    Write-2-Log -Message $ExceptionInner -Severity Error
    Write-2-Log -Message $ErrorLine -Severity Error
    Write-2-Log -Message "Bailing out - Script execution stopped" -Severity Error
    Break
}

Start-sleep -Seconds 15
Write-2-Log -Message "Grabbing all VMs on all clusternodes to start them up" -Severity Information
$AllVMs = Get-VM –ComputerName ($ClusterNodes)
Write-2-Log -Message "We are starting all stopped VMs" -Severity Information
StartVMs $AllVMs
#Hit it again ...
$AllVMs = Get-VM –ComputerName ($ClusterNodes)
StartVMs $AllVMs

The script is below as promised. If you use this without testing in a production environment and it blows up in your face you are going to get fired and it is your fault. You can use it both to introduce as fix the issue. The action are logged in the directory where the script is run from.

Forest and domain functional level to Windows Server 2019

Introduction

My permanent & home lab run 100% on Windows Server 2019 when it comes to infrastructure. AD, DNS, DHCP, 3rd party infra management servers (WiFi controllers, SMS Gateways, net monitoring tools, …). Why, well when it comes to practicing staying current & avoiding tech debt I practice what is preach. And I don’t need to have 20 analysts & management meetings to do so. What is need to know if whether it is supported, whether it works and that I know and understand the implication and benefits. One of the thing to test: raise forest and domain functional level to Windows Server 2019

Running Windows Server 2019 Active Directory

As I’m running Windows Server 2019 Active Directory for 100 percent all is ready to go. It’s a lab remember. A lab with backup actually. Yes, even my lab. So I am ready to pull the trigger. When I went to raise the forest and domain functional level to Windows Server 2019 (Insider build at the time or writing) I got  a little surprise:

image

Well, that’s a first! Why can’t I opt to raise the forest and domain functional level to Windows Server 2019? As it turns out it’s is just not there. Not yet and maybe not ever. Well the changes to the Active Directory schema were not huge to put it mildly. I went from 87 to 88 to in the permanent lab forest. It was a modest change.

Conclusion

That some kind of “functional “level don’t get raised has happened before. Not in AD, but in DFS for example in Windows Server 2016 you still run at Windows 2008 mode for the name spaces and that was a jump from Windows Server 2000 mode! As Windows Server 2019 has not yet gone RTM there is no way of knowing if the forest & domain functional level Windows Server 2019 will be there at that time.

Some might like this as it means there won’t be much application compatibility to worry about. Exchange is one of the most “delaying” factors in moving whole sale to newer AD versions. Sometimes they even change their minds (E2K10SP3 with RU’s & Windows Server 2016 AD was supported for about 3 months before it changed in the compatibility matrix on line). Some other AD integrating 3rd party software might also cause considerable delays.

On the other hand, sometimes I want to block older domain controllers form being installed. In dedicated & specifically managed AD environments where you want to avoid any deviation form this it’s a handy way of enforcing this. Anyway we’ll see how this ends up at RTM. Meanwhile we’ll keep an eye on the previews as I have 17554 to look forward soon to play with at night.

Running the Ubiquiti UniFi Controller as a service

Introduction

I recently had to prepare replacing an aging Aruba Wi-FI deployment with an effective, more capable and budget friendly solution. It needed to offer both corporate (Radius Server) and guest Wi-Fi access for modern workplace needs.

We selected Ubiquiti equipment to comply with the requirements. Apart from the WAPs all gear goes into server & network racks. The controller had to be implemented on-premises (self-managed, not via a service provider). As they have a modern Hyper-V environment we opted to deploy the controller on a Windows 2019 virtual machine. By the time the solution is deployed that will have become generally available. A Cloud Key appliance or Raspberry PI was less interesting in this environment that had professional racks in available in dedicated server & network rooms.

OK, you can use Windows Server 2016 or Windows Server 2012 R2 as well. Note that I don’t like using a client OS for an infrastructure role. I would also not use older server versions because I like longevity in support. I dislike solutions that are out of support a week after I deployed it. The big take away here is that you want to tweak the standard deployment of the controller a bit.

  1. Change the install so it is not tied to a user profile
  2. Run the controller as a service rather than an app you need to start manually or add to auto start.
  3. Configure a certificate for a decent user experience with the UniFi dashboard

Below are my lab notes as reference to myself and my readers in regards to running the Ubiquiti UniFi Controller as a service on Windows Server 2019.

Installation

For some reason the installer dumps all the files in the user profile of the person running the installer. Which is easy in terms of permissions. But people leave and profiles get deleted. Multiple people need to manage systems so having it tied to an individual isn’t that great.

For a UniFi install is first install java (x64) and a x64 bit browser. Chrome & Firefox are support, others may be as well or just work. The controller runs on Java so that’s a no brainer you need it. You don’t need a browser on the virtual machine per se, but it acts as a console access to the controller via the VM in case of network issues. Having multiple options is good.  If you don’t need that, Windows Core will do.

Step by Step

1. Install the controller with the UniFi-installer.exe installer. It will put the installation under C:\Users\USERNAME\Ubiquiti UniFi
2. To move the UniFi controller app you copy the entire folder to the desired location. That could be C:\Program Files or C:\ProgramData. You can even create your own root folder if you don’t want any admin permission to be needed for the folder. For this demo I used C:\ProgramData\Ubiquiti UniFi.
3. I create a shortcut https://unifi.workinghardinit.work:8443 and change the Icon to one I created for this purpose.

clip_image001

4. I then also change the “Target” path to “C:\ProgramData\Ubiquiti UniFi\lib\ace.jar” ui and “Start in” path to “C:\ProgramData\Ubiquiti UniFi”path. That way that short cut points to the right location. However, I want my controller to run as a service so we won’t be using that shortcut too much.

clip_image003

Anyway, we have a clean nice setup right now to continue with. Please note you do not need to install a browser on the server itself. This was done to give people a virtual machine console access option in case they have network issue. If don’t want that you can use Windows Server Core

Running as a service

Since we want the controller to always run and behave like a service, we just have some extra work to do. This is documented here: https://help.ubnt.com/hc/en-us/articles/205144550-UniFi-Run-the-Controller-as-a-Windows-service I just adapted this to my path.

1. Close any instances of the UniFi software on the computer. If you just installed the UniFi controller, make sure to open it once by using the icon on the desktop or within the start menu. Once it says “UniFi Controller (a.b.c) started.” you can close the controller program. This is needed to generate some required files for the service to work.
2. Open the command prompt as an Administrator. For example, on Windows 10, right click on the Start Menu and choose “Command Prompt (Admin)”.
3. Change directory to the location of UniFi in your computer using the following command (exactly as it is here, no substituting needed): cd “C:\ProgramData\Ubiquiti UniFi\”
4. Once in the root of the UniFi folder, issue the following (this installs the UniFi Controller service): java -jar lib\ace.jar installsvc
5. Once you’re at a new command prompt line, after it says “Complete Installation…”, issue the following: java -jar lib\ace.jar startsvc

Installing a proper certificate

After entering the FQDN A record or CNAME to your DNS infra you will still get a security warning as we haven’t installed a proper certificate yet.

clip_image005

Let’s fix this unprofessional looking fist view of your controller web application! We’ll use a recent cert from either a corporate or public PKI. Take your pick, there are free ones out there if you need that.

I’m using a wild card certificate and will show you how to implement it with the Unifi controller. The trick is to replace default Keystore with a custom one in which you added your certificate. There is are nice tools for that and the exact method will vary a bit. This is what I did. Note that you can do this on your workstation, no need o do all this on your server with the UniFi Controller. Keep that tidy.

Make sure you have your cert available (exported) as a pfx file.

The Windows application method

Download KeyStore Explorer (http://keystore-explorer.org/downloads.html) and install in on your PC, the default settings are just fine.

Have your certificate exported as pfx file with private key and the option “Include all certificates in the certification path if possible”.

Run KeyStore Explorer and under tools select “Import Key Pair”

clip_image006

As type select PKCS #12

clip_image007

Browse to your pfx cert you created, fill out the correct password and click “Import”

clip_image008

I’m happy with my default alias of * as I have a wild card cert. You should use unifi.domain.ext if you don’t have a wild card to be clear.

clip_image009

Enter the new Key Pair password, again I use “aircontrolenterprise”

clip_image010

Click OK and your see that your import was successful. Click OK.

clip_image012

Now select your keypair and under the File menu select “Save As”

clip_image013

For the password, again, use aircontrolenterprise, click OK and fill out keystore for the file name.

clip_image015

Click save, your done here.

I actually delete the imported key pair form KeyStore Explorer and also shift delete the export pfx. It’s better not to have these sorts of files lingering around on your workstation even when using bitlocker. You must have a cert management process.

The results of your work

Now on your controller VM navigate to your data path, in my case it’s C:\ProgramData\Ubiquiti UniFi\data. Rename the original keystore file to keystor.ori and past the one you created in this folder.
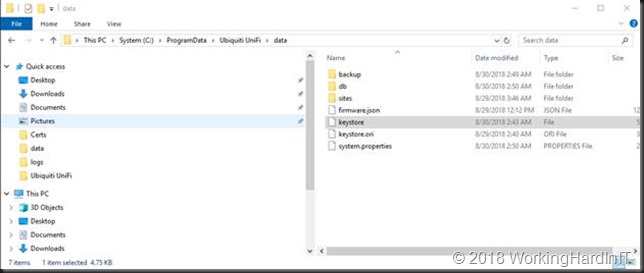
clip_image019

You then need to restart the UniFi Controller service, either in the GUI or via the command prompt.
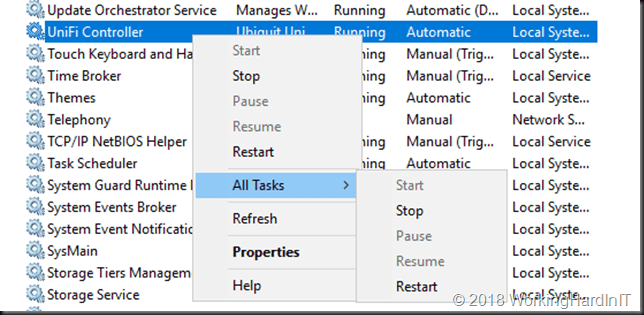
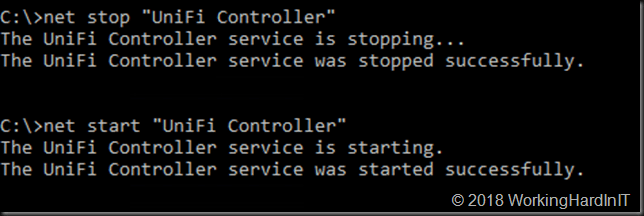
clip_image020

clip_image021

Give the controller 10 second to get going properly and click your UniFi Dashboard shortcut to browse to the application. And now, as you can see, below we have a much better user experience. This is actually the logon screen after you’ve run through the initial install wizard when you first launch the application.
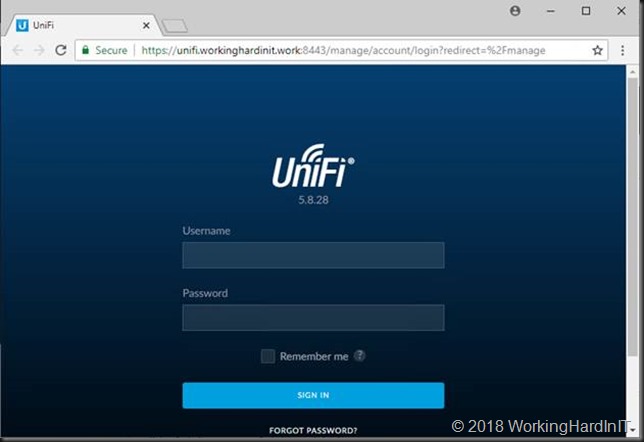
clip_image023

We now have a well-behaved web application to securely access the UniFi controller and manage the Wi-Fi setup.jjj

The native java tools method

If you want you can use native Java tools to do the same as with the KeyStore Explorer app replace those steps above by the one below.

C:\Program Files\Java\jre1.8.0_181\bin>Keytool.exe -list -keystore C:\SysAdmin\Certs\exported_wildcard_workinghardinit_work.pfx -storetype pkcs12  which prompts for your password and outputs:

Enter keystore password:
Keystore type: PKCS12
Keystore provider: SunJSSE

Your keystore contains 1 entry

1524853e062d1785ac5ebedb44a61065, Aug 30, 2018, PrivateKeyEntry,
Certificate fingerprint (SHA1): 7A:82:FC:6E:2D:4D:79:F2:43:7A:FE:57:48:BE:13:FB:C4:AF:ED:71

C:\Program Files\Java\jre1.8.0_181\bin>keytool -importkeystore -srcstoretype pkcs12 -srcalias 1524853e062d1785ac5ebedb44a61065 -srckeystore C:\SysAdmin\Certs\exported_wildcard_workinghardinit_work.pfx -keystore C:\SysAdmin\Certs\keystore -destalias *.workinghardinit.work

Importing keystore C:\SysAdmin\Certs\exported_wildcard_workinghardinit_work.pfx to C:\SysAdmin\Certs\keystore…

Enter destination keystore password: aircontrolenterprise
Re-enter new password: aircontrolenterprise
Enter source keystore password: aircontrolenterprise => the password use to protect the pfx exported, can be anything

Warning:
The JKS keystore uses a proprietary format. It is recommended to migrate to PKCS12 which is an industry standard format using “keytool -importkeystore -srckeystore C:\SysAdmin\Certs\keystore -destkeystore C:\SysAdmin\Certs\keystore -deststoretype pkcs12”.

Conclusion

Ubiquiti delivers value for money Wi-fi solutions. The gear is good and affordable with manageability options that serve the majority of needs for the SME. It perfect for the more demanding SOHO environment.

Ubiquiti offers flexibility but also requires some “tweaking” to get just right. This goes for both the software installation (fixing some default installation choices and installing a certificate) as well as some of the hardware (installing less loud fans) shortcomings.

For many people a virtual machine with Windows is something they already have the infrastructure for. It fist perfectly into their existing operational processes. A virtual machine also fits well into many customers their existing backup and restore scenarios. A virtual machine can also easily be “checkpointed” to revert to a known good situation. This is an extra benefit in case something goes wrong during an upgrade or update wrong. This combined with the Auto Backup Configuration of the UniFi controller cover most bases for quick recovery. Not too many people can restore their raspberry PI or appliance that fast.

We chose to use Windows Server 2019 in this demo as we wanted to future proof the deployment . So we want to deliver the controller on an OS that will serve them well for many years to come.

To recap, first I showed you how to improve on the default installation. We than made the UniFi controller runs as a service. Finally I configured an SSL certficate for the controller app. I hope you liked it and that it helps you out.