IIS 6.0 SMTP Service in-place upgrade to Windows Server 2022

IIS 6.0 SMTP Service in-place upgrade to Windows Server 2022

This will be a “notes from the field” type of blog post where I will guide you to successfully execute an IIS 6.0 SMTP Service in-place upgrade to Windows Server 2022. In this case, the original operating system version is Windows Server 2019. However, these notes can be used for upgrades between other Windows Server versions as well.

Yes, there are still valid reasons to run an SMTP relay service today. I use SendGrid as a smart host with these and I actually have these setup behind a KEMP LoadMaster for High Availability.

What could go wrong?

What could go wrong? Well, nothing unless you didn’t plan certain things in advance. Below are the issues you will face. and need to prepare for and fix in order to perform an IIS 6.0 SMTP Service in-place upgrade to Windows Server 2022

  • The IIS 6 Management Console will be missing

For some reason that gets dropped during the in-place upgrade. The fix is to reinstall it. Easy enough.

  • Your SMTP Virtual services configuration will be wiped out during an in-place upgrade.

Yes, it will be a very empty console. Which is a scary experience if you did not prepare for it.

All your SMTP virtual servers will be gone

The trick is to create a backup and restore it. That way you get your configuration back. So, first of all, create a backup of your IIS configuration. We will go over this later. Secondly, before you can restore your backup you need to reinstall the IIS 6 Management Console as stated above. When you have restored the backup reboot the server, but before you do reconfigure the Simple Mail Transport Protocol service to start automatically.

  • Simple Mail Transport Protocol Service

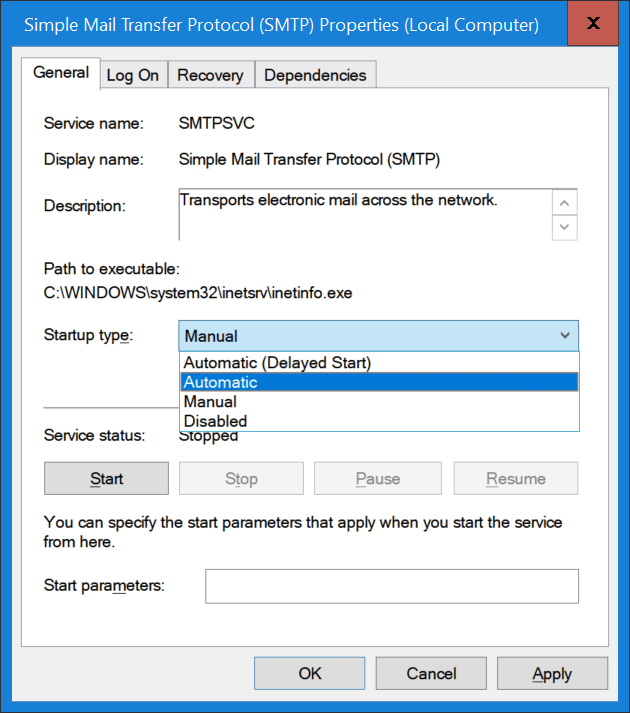
The Simple Mail Transport Protocol Service will be set to reset to its default, which is to start manually start instead of automatically. This one is easily fixed but you need to remember to do so as your SMTP Virtual Servers will not be running after a restart. And as you keep your servers patched that will be at least once a month probably.

Step-by-step

  • Backup the current configuration

The easiest way to do this is via appcmd. Open an elevated command prompt and navigate to C:\Windows\System32\inetsrv. Run the following command.

appcmd add backup MYBACKUPNAME

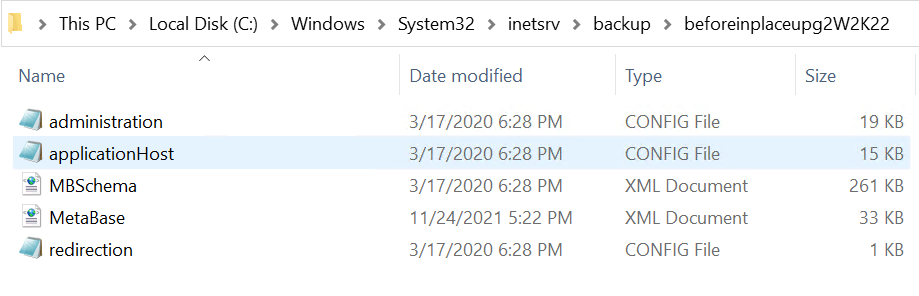
The backup is stored under C:\Windows\System32\inetsrv\Backups\MYBACKUPNAME. Verify it is there, it should contain the following files:

  1. administration.config
  2. applicationHost.config
  3. MBSchema.xml
  4. MetaBase.xml
  5. redirection.config
IIS 6.0 SMTP Service in-place upgrade to Windows Server 2022
Verify your backup files are there

This folder is preserved during the upgrade but you can always grab a copy to be on the safe side.

  • Perform the in-place upgrade

This is the normal process, nothing special about it unless you run into trouble, which is not very likely in well-maintained environments.

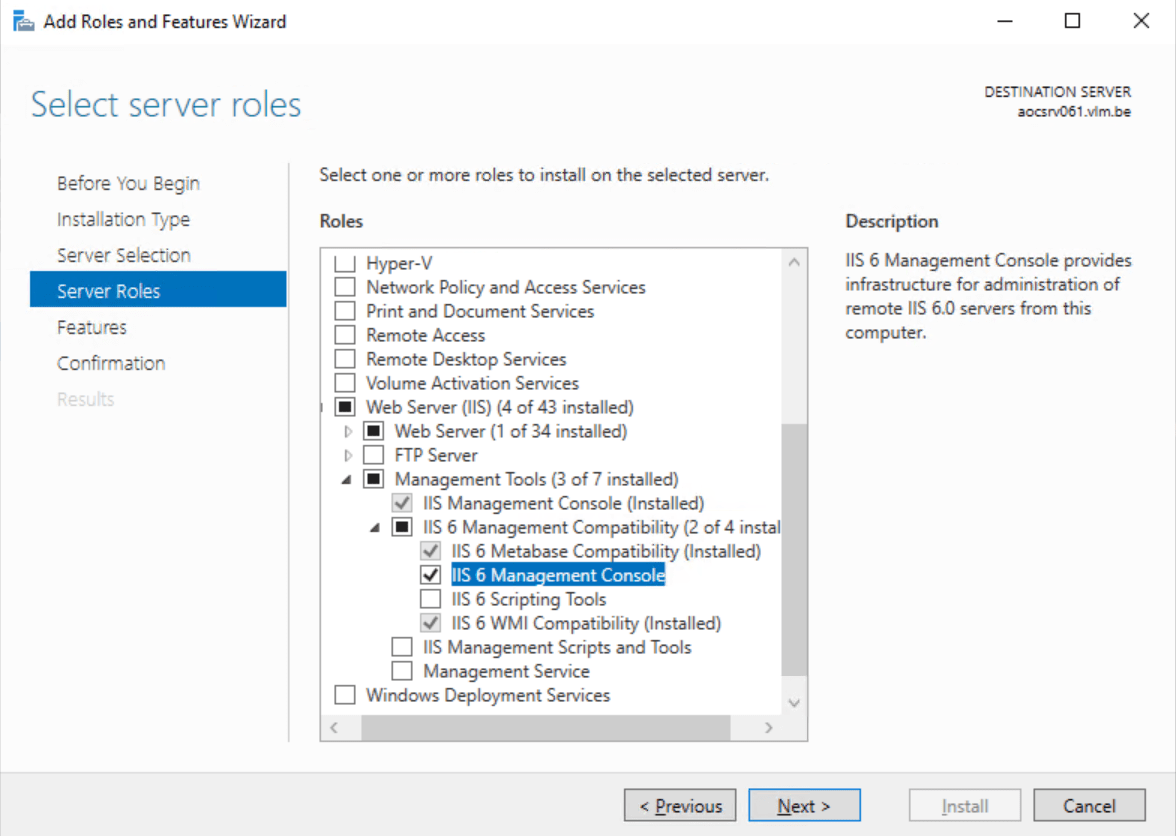
  • Reinstall the IIS 6 Management console

This is easily done via the Add Roles and Features Wizard and does not require a reboot.

IIS 6.0 SMTP Service in-place upgrade to Windows Server 2022
Reinstall the IIS 6 Management Console
  • Set the Simple Mail Transport Protocol service to start automatically
IIS 6.0 SMTP Service in-place upgrade to Windows Server 2022
Set the Simple Mail Transport Protocol service startup type to Automatic
  • Restore your IIS backup

Open an elevated command prompt and navigate to C:\Windows\System32\inetsrv. Run the following command.

appcmd restore backup MYBACKUPNAME

  • Restart the server

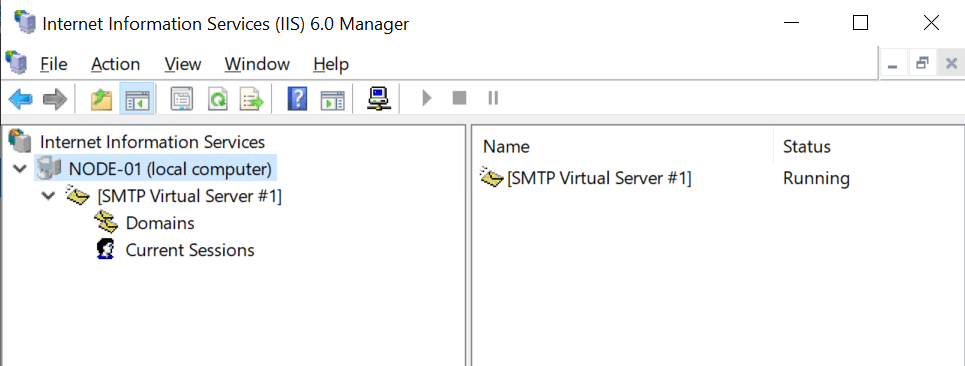
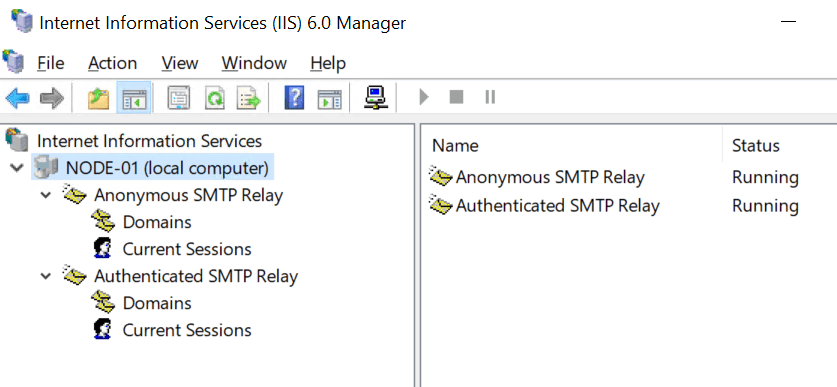
When you have restarted the server open the IIS 6 Management console. Your SMTP virtual Services should be backup up and running.

IIS 6.0 SMTP Service in-place upgrade to Windows Server 2022
You have your SMTP Virtual Servers back!

Test your SMTP functionality via a PowerShell script for example to verify all is well.

Conclusion

In-place upgrades work quite well but certain roles and configurations have their quirks and issues to solve. Some lab work to test scenarios and their outcome is helpful when preparing an in-place upgrade.

This is the case for IIS 6.0 based SMTP Service role. We have shown you how to work around this and successfully perform an IIS 6.0 SMTP Service in-place upgrade to Windows Server 2022. The thing is, this is not related to Windows Server 2022, it is an IIS 6.0 issue.

With virtual machines leverage the luxury of checkpoints for fast and easy recovery before you begin. Also, make sure you have a tested backup to restore. Always have options and avoid painting yourself into a corner.

Windows Server 2019 in place upgrade testing

Windows Server 2019 in place upgrade testing

In theory in place upgrade testing is easy. You just validate Microsoft’s efforts and testing that went into the process. If it succeeds all is well. Well, not really. The amount of permutations in real life are so large it can never be done for all of them. But even today in this era of “services as cattle” they have a role to play. I would say, even more than before. That means that Windows Server 2019 in place upgrade testing is also important.

image

In place upgrade paths to Windows Server 2019

In-place upgrade allows an administrator to upgrade an existing installation of Windows Server to a newer version, retaining settings and installed features.

The following (Long Term Service Branch) LTSC versions and editions of Windows Server with their supported path for in-place upgrade are shown below:

image

Please note that when you are performing cluster operating system rolling upgrades this can only be done from N-1 to N. This means that you can only do those from Windows Server 2016 to Windows Server 2019.

image

The ability to perform cluster operating system rolling upgrades is just one benefit you get by keeping your environment current.

Conclusion

Currently Myself and a couple of fellow MVPs are busy  doing some testing on “real” hardware. That means servers, the kind you’d use in a professional environment, not the PC lab. Testing on virtual machines rocks and those are heavily used in real life, but you can’t test everything you need to verify hardware deployments. Think about S2D, Persistent Memory, SET, vRSS/VMQ/VMMQ etc.

Part of that testing is in place upgrades. Yes, there are times and places when I will avoid them, there are also moments where I leverage them. I do think they are important and they have their place. Doing them depends on the value it can offer.

Whatever you do, you test, you verify and your break stuff in the lab before casually on a Monday morning upgrading a cluster to a new version of the Operating System. I hope I don’t need explain this anymore anno 2018? Or actually I do, we always have new talent join us and we all have to learn. So big tip, learning on the job doesn’t always equal learning in production. That will happen anyway, but don’t default to it.

In-place upgrade of an Azure virtual machine

Introduction

In the cloud it’s all about economies of scale, automation, wipe and (redeploy). Servers are cattle to be destroyed and rebuild when needed. And “needed” here is not like in the past. It has become the default way. But not every one or every workload can achieve that operational level.

There are use cases where I do use in place upgrades for my own infrastructure or for very well known environments where I know the history and health of the services. An example of this is my blog virtual machine. Currently that is running on Azure IAAS, Windows Server 2016, WordPress 4.9.1, MySQL 5.7.20, PHP. It has never been reinstalled.

I upgraded my WordPress versions many times for both small incremental as major releases. I did the same for my MySQL instance used for my blog. The same goes for PHP etc. The principal here is the same. Avoid risk of tech debt, security risks and major maintenance outages by maintaining a modern platform that is patched and up to date. That’s the basis of a well running and secure environment.

In-place upgrade of an Azure virtual machine

In this approach updating the operating system needs to be done as well so my blog went from Windows Server 2012 R2 to Windows Server 2016. That was also an in place upgrade. The normal way of doing in place upgrades, from inside the virtual machine is actually not supported by Azure and you can shoot yourself in the foot by doing so.

The reason for this is the risk. You do not have console access to an Azure IAAS virtual machine. This means that when things go wrong you cannot fix it. You will have to resort to restoring a backup or other means of disaster recovery. There is also no quick way of applying a checkpoint to the VM to return to a well known situation. Even when all goes well you might lose RDP access (didn’t have it happen yet). But even if all goes well and that normally is the case, you’ll be stuck at the normal OOBE screen where you need to accept the license terms that you get after and upgrade to Windows Server 2016.

clip_image002

The default upgrade will boot to that screen and you cannot confirm it as you have no console access. If you have boot diagnostics enabled for the VM you can see the screen but you cannot get console access. Bummer. So what can you do?

Supported way of doing an in-place upgrade of an Azure virtual machine

Microsoft gives you two supported options to upgrade an Azure IAAS virtual machine in

An in-place system upgrade is not supported on Windows-based Azure VMs. These approaches mitigate the risk. The first is actually a migration to a new virtual machine. The second one is doing the upgrade locally on the VHD disk you download from Azure and then upload to create a new IAAS virtual machine. All this avoids messing up the original virtual machine and VHD.

Unsupported way of doing an in-place upgrade of an Azure virtual machine

There is one  way to do it, but if it goes wrong you’ll have to consider the VM as lost. I have tested this approach in a restored backup of the real virtual machine to confirm it works. But, it’s not supported and you assume all risks when you try this.

Mount your Windows Server 2016 ISO in the Windows Server 2012 R2 IAAS virtual machine. Open an administrative command prompt and navigate to the drive letter (mine was ESmile of the mounted ISO. From there you launch the upgrade as follows:

E:\setup.exe /auto upgrade /DynamicUpdate enable /pkey CB7KF-BWN84-R7R2Y-793K2-8XDDG /showoobe none

The key is the client KMS key so it can activate and the /showoobe none parameter is where the “magic” is at. This will let you manually navigate through the wizard and the upgrade process will look very familiar (and manual). But the big thing here is that you told the upgrade not to show the OOBE screen where you accept the license terms and as such you won’t get stuck there. So fare I have done this about 5 times and I have never lost RDP access due to the in-place upgrade. So this worked for me. But whatever you do, make sure you have a backup, a  way out, ideally multiple ways out!

Note that you can use  /Quiet to automate things completely. See  Windows Setup Command-Line Options

Nested virtualization can give us console access

Since we now have nested virtualization you have an option to fix a broken in-^lace upgrade but by getting console access to a nested VM using the VHD of the VM which upgrade failed. See:

Conclusion

If Microsoft would give us virtual machine console access or  DRAC or ILO capabilities that would take care of this issue. Having said all that, I known that in place upgrades of applications, services or operating systems isn’t the cloud way. I also realize that dogmatic purism doesn’t help in a lot of scenarios so if I can help people leverage Azure even when they have “pre cloud” needs, I will as long as it doesn’t expose them to unmanaged risk. So while I don’t recommend this, you can try it if that’s the only option you have available for your situation. Make sure you have a way out.

IAAS has progressed a tremendous amount over the last couple of years. It still has to get on par with capabilities we have not only become accustomed to but learned to appreciate over over the years. But it’s moving in the right direction making it a valid choice for more use cases. As always when doing cloud, don’t do copy paste, but seek the best way to handle your needs.

Windows Data Deduplication and Cluster Operating System Rolling Upgrades

Introduction

Have you considered when Windows data deduplication and cluster operating system rolling upgrades from Windows Server 2012 R2 to Windows Server 2016 Clusters are discussed we often hear people talk about Hyper-V or Scale Out File Server clusters, sometimes SQL but not very often for a General-Purpose File Share server with continuous availability. Which is the kind I’ve done quite a number of actually.

clip_image002

Being active in an industry that produces and consumes file data in large quantities and sizes we have been early implementers of Windows cluster for General-Purpose File Shares with continuous availability. This provides us the benefits of SMB 3, ODX for both the clients and IT Operations for workloads that are not suited for Scale Out File Server deployments.

As such we have dealt with a number of Windows 2012 R2 GPFS with GA cluster that we wanted to move to Windows Serer 2016. Partially to keep the environment up to date and partially because we want to leverage the new Windows deduplication capabilities that this OS version offers. The SOFS and Hyper clusters that I upgraded didn’t have data deduplication enabled.

The process to perform this upgrade is straight forward and has been documented well by others as well as by me in regards to issues we saw in the field . We even dove behind the scenes a bit in Cluster Operating System Rolling Upgrade Leaves Traces. I have also presented on this topic in public at conferences around Europe (Ireland, Germany and Belgium) as part of our community contributions. No surprises there.

Test your assumptions

This is a scenario you can perform without any downtime for your clients when all things go well. And normally it should. I have upgraded a couple of Scale Out File Server (SOFS) and General-Purpose File Server (GPFS) cluster with Continuous availability now and those went very well. Just make sure your cluster is perfectly healthy at the start.

Naturally there are some check you need to make that are outside of Microsoft scope:

I’m pretty sure you have good backups for your file data and you should check this works with Windows Server 2016 and how it reacts during the upgrade while the server is in mixed mode. Perhaps you will or won’t be able to run backups or restore data. Check and know this.

Verify your storage solution supports and words with Windows Server 2016. It sounds obvious but I have seen people forget such details.

Another point of attention is any Anti-Virus you might have running on the file server cluster nodes. Verify that this is fully supported on Windows Server 2016. On top of that validate that the Anti-Virus still works well with ODX so you don’t run into surprises there. Don’t assume anything.

Check if the server and it components (HBA, NICs, BIOS, …) its firmware and drivers support Windows Server 2016. Sure, the rolling upgrade allows for some testing before committing but that doesn’t mean you should go ahead blindly into the unknown.

Make sure your nodes are fully patched before and after the upgrade of a cluster node.

As the file server cluster is already leveraging SMB 3 with continuous availability al the prerequisites to make that work are already take care of. If you are upgrading a File server cluster without continuous availability and are planning to start using this, that’s another matter and you’ll need to address any issues. You can do this before or after moving to Windows Server 2016. This means you’d move to a solution before you upgrade or after you have performed the upgrade to Windows Server 2016.

You can take a look at my blogs on this subject from the Windows 2012 R2 time frame such as More Tips On Dealing With Removing Short File Names When Migrating To a SMB3 Transparent Failover File Server Cluster, Migrate an old file server to a transparent failover file server with continuous availability and SMB 3, ODX, Windows Server 2012 R2 & Windows 8.1 perform magic in file sharing for both corporate & branch offices

Data deduplication takes some extra consideration

I have blogged before on how Windows Server 2016 Data Deduplication performs and scales better than it did it Windows Server 2012 R2. This also means that it works at least partially different than it did Windows Server 2012 R2. You can see this in some of the updates that came out in regards to a data corruption bug with data deduplication which only affected Windows Server 2016.

clip_image003

Given this difference, what would happen if you fail over a LUN with deduplication enable from Windows Server 2012 to Windows Server 2016 and vice versa? That’s the question I had to consider when combining Windows data deduplication and cluster operating system rolling upgrades for the first time.

Windows Server 2016 is backward compatible and will work just fine with a LUN that from and Windows Server 2012 Server that has Windows data deduplication enabled. The reverse is not the case. Windows Server 2012 R2 is not forward compatible. When dealing with data deduplication in an Operating System Rolling Upgrade scenario I’m extra careful as I cannot guarantee any LUN movement scenario will go well. With a standalone server

Once I have failed over a LUN to Windows Server 2016 node in a mixed cluster I avoid moving it back to a Windows Server 2012 R2 node in that cluster. I only move them between Windows Server 2016 nodes when needed.

I move through the rolling upgrade as fast as I can to minimize the time frame in which a LUN with data deduplication could end up moving from a Windows Server 2016 o a Windows Server 2012 cluster node.

Should I need to reverse the Operating System Rolling Upgrade to end up with a Windows Server 2012 R2 cluster again I’ll make absolutely sure I can restore the data from LUNs with data deduplication from backup and/or a snapshot from a SAN or such. You cannot guarantee that this will work out fine. So be prepared.

For “standard” non deduplicated NTFS LUNs you can fail back if needed. When data deduplication is enabled you should try to avoid that and be prepared to restore data if needed.

Final advise is always the same

Even when you have tested your upgrade scenario and made sure your assumptions are correct you must have a way out. And as always, “One is none, two is one”.

As always during such endeavors you need to make sure that you have a roll back scenario in things do not work out. You must also have a fail back plan for when things turn really bad. For most scenarios has the ability to return to the original situation built in. But things can go wrong badly and Murphy’s Law does apply. So also have the backups and restore verified just in case.

The last thing you need after a failed upgrade is telling your customer or employer “it almost worked” but unfortunately, they’ve lost that 200TB of continuous available data. Better next time doesn’t really cut it.