This post is a personal repository of the FIDO2 AAGUID lists for the security keys from different vendors. That way I have a quick reference publically available for my own use whilst helping others find them as well.
Your organization does not allow you to add your account to Microsoft Authenticator
I was testing a bunch of scenarios with passwordless authentication in Azure Active Directory on a weekend. Things were looking good. I created some test accounts and played with a bunch of permutations to see how things behaved, Think about Conditional Access policies in combination with authentication methods, etc. The aim was to have multiple passwordless authentication options per user for redundancy. On top of that, I want to have this for multiple accounts (separation of duties). That latter requirement tripped me up.
I succeeded at most of my goals. But at one moment I received the following error trying to register the Microsoft Authenticator app on my phone for one of my test users. Warning “Account not added” and the message “Your organization does not allow you to add your account to Microsoft Authenticator” What’s going on here?
Passwordless sign-in with the Microsoft Authenticator app
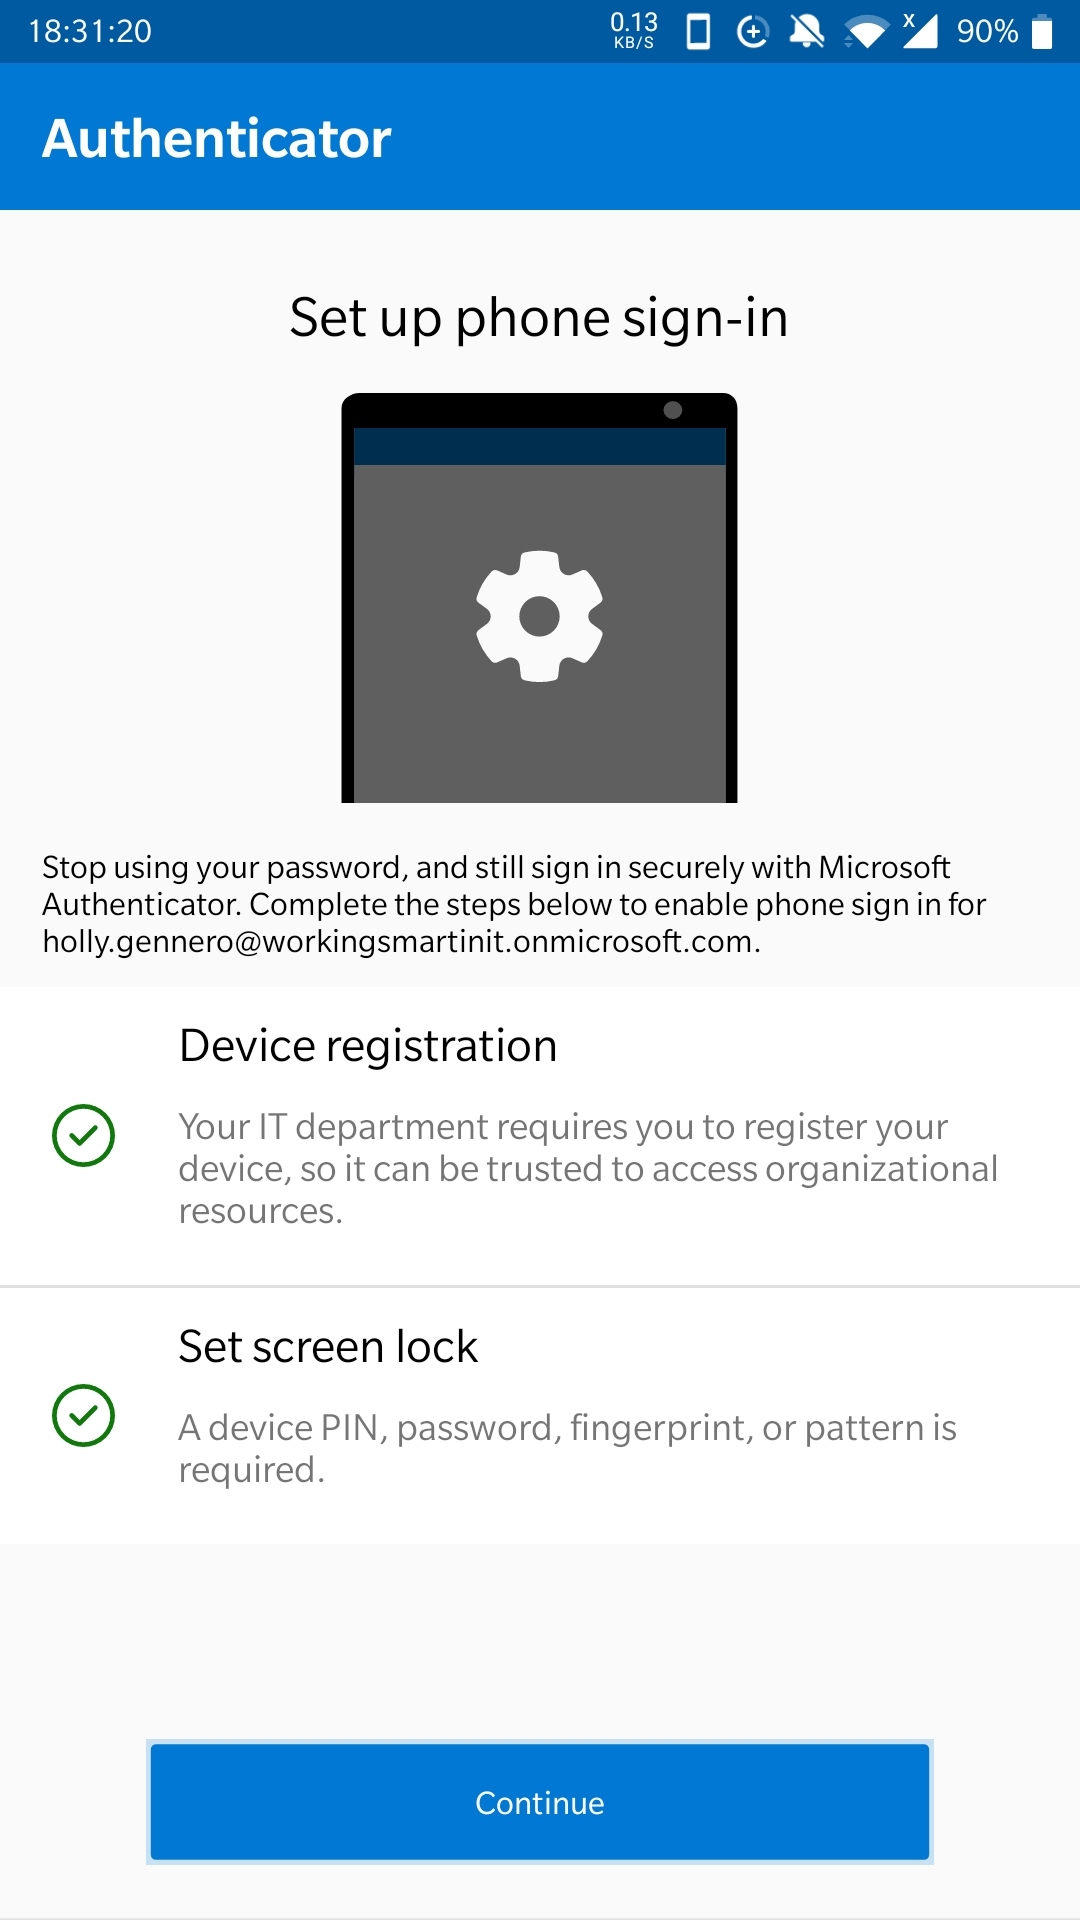
First of all, before you can create this new strong credential, there are prerequisites. One prerequisite is that you must register the device on which you installed the Microsoft Authenticator app within the Azure AD tenant to an individual user. In that requirement lies the answer to our error message.
Set up phone sign-in
Device Registration and Set screen lock
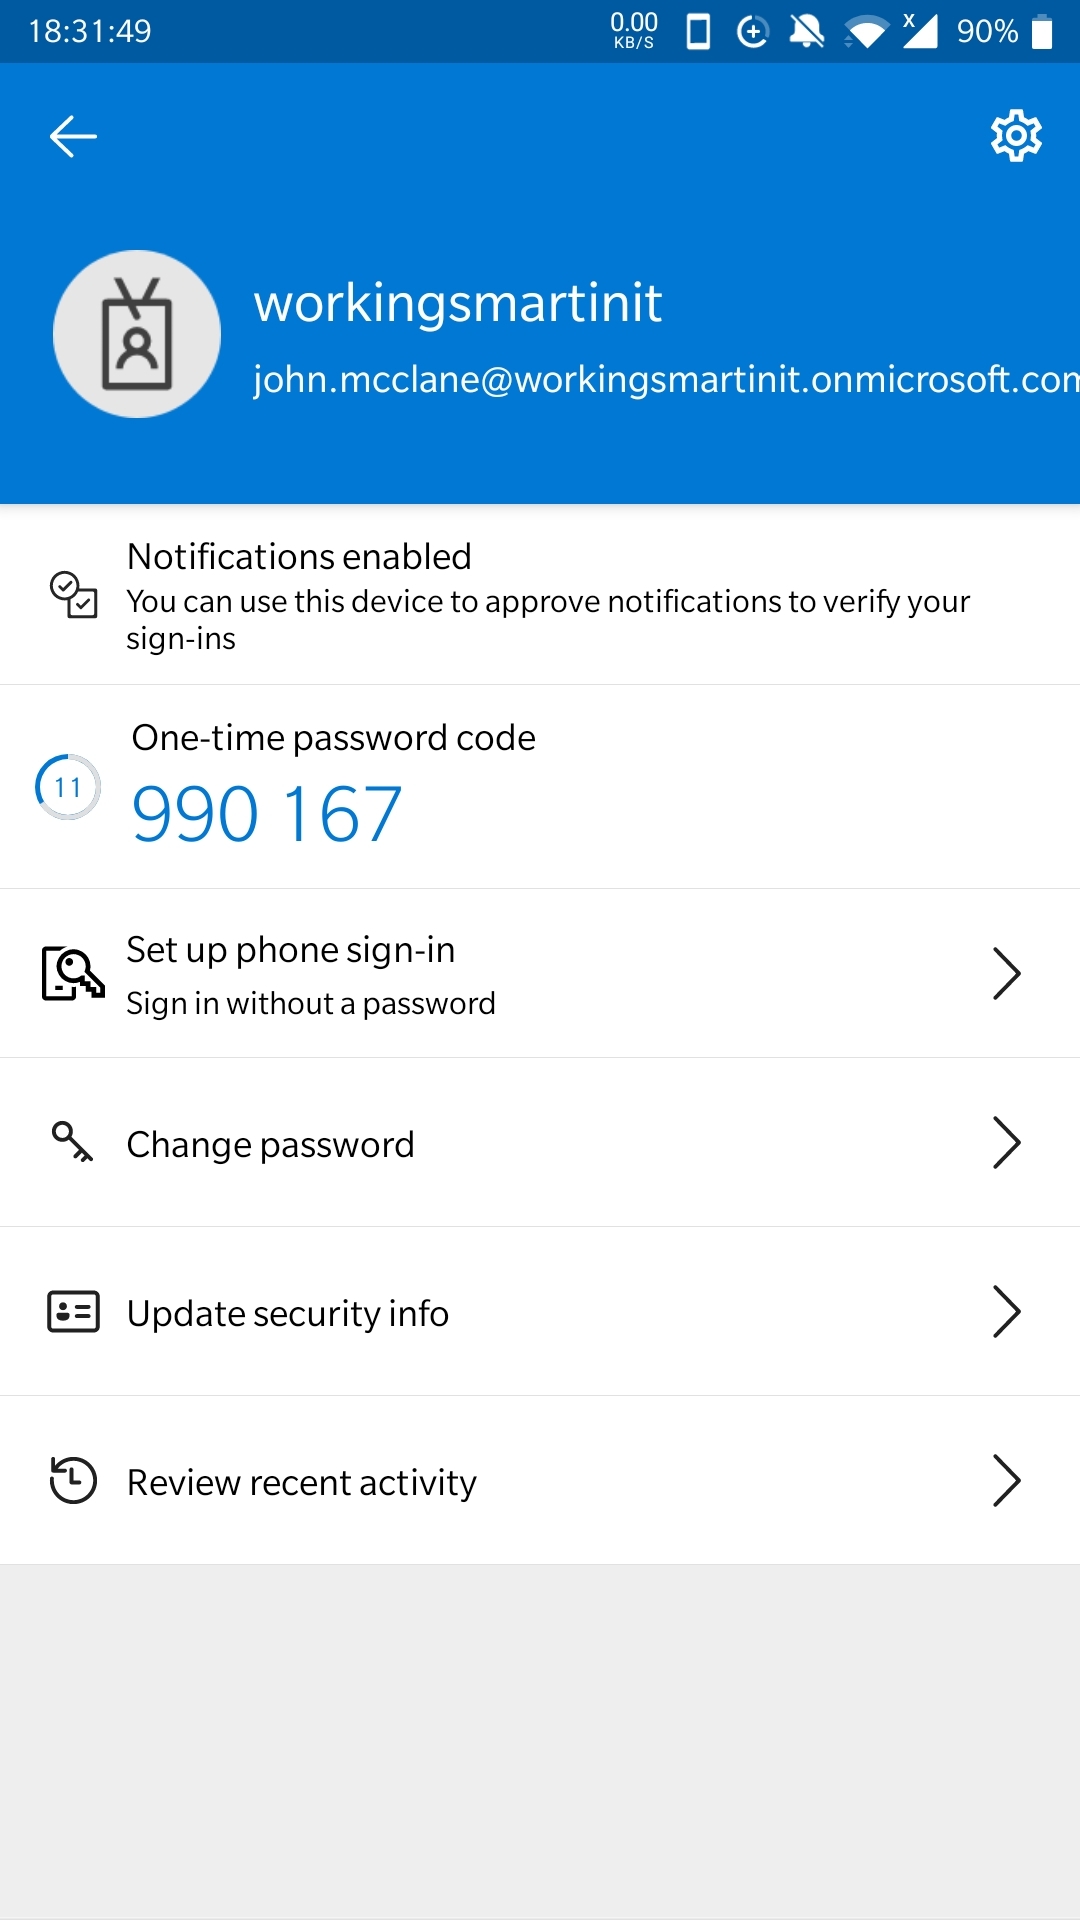
I already have this device registered for another account
Currently, you can only register a device in a single tenant. This means you can enable only one work or school account in the Microsoft Authenticator app for passwordless sign-in.
So we can only use our smartphone with the Microsoft Authenticator app in a single-tenant, with a single user. And that’s why I got the error. I already had another test user on that phone set up sign-in without a password. My device is already registered for another user in Azure AD in that tenant. There can be only one.
Do note that you can still use the authenticator app as an MFA method with your password. It is the passwordless scenario that doesn’t work under these conditions.
Achieving my goals
This is annoying when testing but it can also be annoying in real life. I tend to have multiple accounts in an Azure AD. I log in with a different account depending on what work I need to do and what roles/rights this requires. That’s why I like FIDO2 security keys with biometrics as a passwordless option.
What I need is a passwordless solution I can use with multiple accounts in the same and other tenants. That, I can do this with my FIDO2 BioPass security key from FEITIAN just fine. I can register my security key with multiple accounts and be on my way. With one smartphone with the Microsoft Authenticator app installed, you cannot add multiple accounts on the phone for passwordless authentication (device registration) at this moment in time. That’s what the error message means to tell you but the wording confused me for a while.
Allow or block specific FIDO2 security keys in Azure
There might be situations where you want to allow or block specific FIDO2 security keys in Azure. A policy mandating biometric FIDO2 keys will enforce the specific biometric capable FIDO2 security keys. This blog post provides an example of how to achieve this in Azure.
Allowing only a specific type of security key in Azure
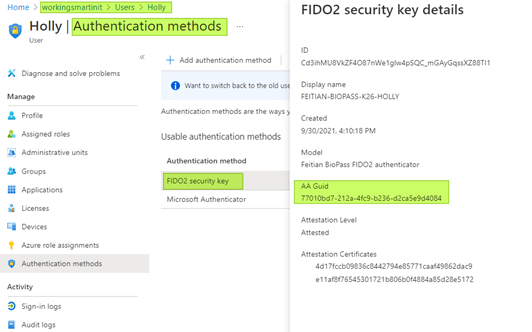
In my example, I enforce the use of one particular biometric key, meaning that other, non-biometric FIDO2 security keys are blocked. In the lab, I only have a biometric key and a non-biometric key. I want to allow only my FEITIAN BioPass K26 security key and block the use of any other type.
We can achieve this surprisingly quickly in Azure. The capability to do so leverages the Authenticator Attestation GUID (AAGUID). During attestation of the security key, the AAGUID comes into play for looking up the device’s metadata in the FIDO Alliance Metadata Service – FIDO Alliance. As the AAGUID uniquely identifies a type of key from a specific vendor, we can use it to allow or block particular types of keys.
Note that a “type” of keys does not mean unique keys form factors by default. Keys from a vendor with the same capabilities and functionality but with different interfaces can have the same AAGUID. For example, the FEITIAN BioPass security keys come in multiple interface variants (USB-A, USB-C, Bluetooth, NFC). The K26 has a USB-C interface, and the K27 has a USB-A interface. Yet, both have the same AAGUID. So, when I allow a security key with this AAGUID in Azure, both models of the same type will be allowed. The eiPass, a touch-only device with a USB-C and a Lightning interface, will be blocked as we did not put it in our allow list.
How do you find out the AAGUID?
Perhaps the easiest way of finding out the AAGUID of your security key is to look it up in Azure if you have registered the key there. That is feasible because you will have been testing the security key or keys you want to allow. Now, when you want to block specific keys, you might not have added them. You might not even have them. Then you will need to find the AAGUID online or from the vendor.
There is also a Python script (in the Python-FIDO2 library provided by Yubico) you can use to find out the AAGUID. But, again, you need to have the device to do this.
Now, some vendors publish a list of AAGUID values for their devices. Here is the AAGUID list from Ubico and TrustKey. Of course, you can always reach out to your vendor to get them.
Setting FIDO2 security key restrictions
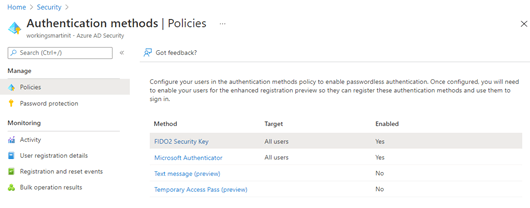
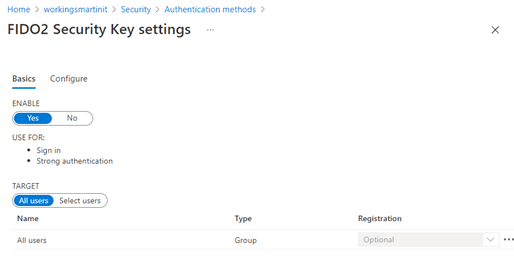
First of all, make sure that you have enabled the FIDO2 Security Key authentication method. You do this in the Azure portal by navigating to Azure Active Directory > Security > Authentication methods
Secondly, under Policies, click on FIDO2 Security Key to enter its settings. Under Basics, set ENABLE to Yes and set TARGET to All users or a selection of users. If you choose the latter, add users or a group of users.
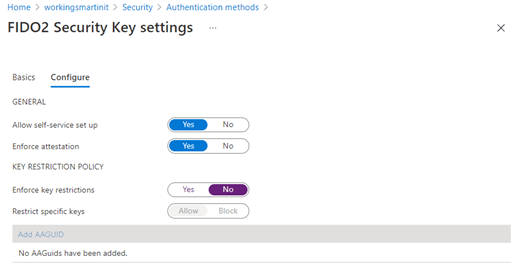
In the FIDO2 Security Key settings under Configure, you find two sections GENERAL and KEY RESTRICTION POLICY.
Under GENERAL
You will generally have Allow self-service setup enabled and Enforce attestation set to Yes
Under KEY RESTRICTION POLICY
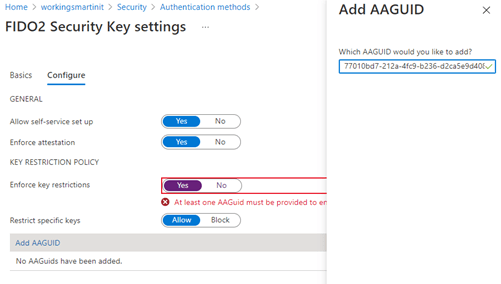
Set Enforce key restrictions to Yes
Set Restrict specific keys to Allow
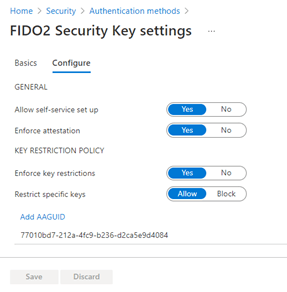
Add the AAGUID of the K26 FEITIAN BioPass FIDO2 security key: 77010bd7-212a-4fc9-b236-d2ca5e9d4084
Click Save to activate the policy.
Here, I work with an allow list, so only security keys with their AAGUID in that list will be allowed to register and will work. If we used a blocklist, you allow all keys except those we explicitly put in the block list.
The effects of FIDO2 security key restrictions
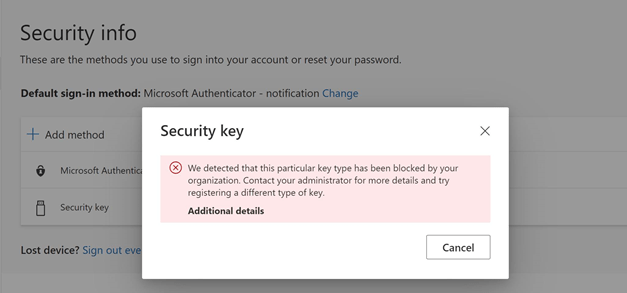
So, let’s look at what happens when an end-user has a security key that is not explicitly allowed or is explicitly blocked and tries to register it. First, we allowed self-service so that the user could register their keys by themselves. They do this in the security info section under My Profile or My Sign-Ins. The process seems to work well with the FEITIAN eiPass USB-C/Lightning FIDO2 Security key, which has no biometrics. Hence we don’t allow it.
The user can complete the workflow right up to naming their security key, but when they want to apply the settings, it throws the below error.
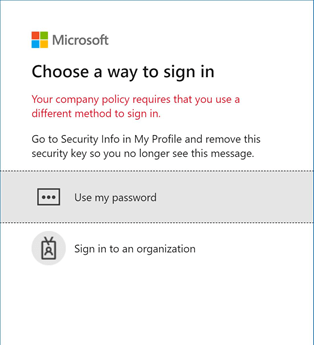
That’s cool. What happens to users that have already registered a security key type we now block or don’t allow? Does that still work or not? Let’s find out! I tried to log on with a security key that was previously allowed, but we now blocked it. All goes well up to when I swipe my fingerprint. Then, it informs me, I cannot log in using the method and advises me to sign in via a different method and remove this security key. That is what we expect.
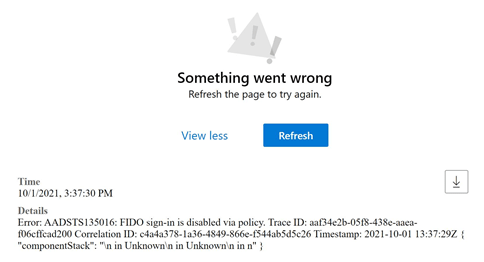
Finally, what happens when someone changes the policy while a user is still logged in? It either throws the same message as above or while navigating, or it throws a “something went wrong” message in your browser. When you click “View more,” it becomes evident a policy is blocking your FIDO security key.
All in all, Azure offers straightforward, effective, and efficient ways of managing what keys to allow or block. Going passwordless when you have played with the FIDO2 security keys seems a lot less complicated and scary than you might think. So please test it out and go for it. A better, safer, and easier authentication method is within grasp for everyone!
In this blog post, we will configure a FEITIAN FIDO2 BioPass security key. As you might know from a previous blog post, FEITIAN FIDO2 security keys – Working Hard In ITWorking Hard In IT, I have a FEITIAN FIDO2 BioPass security key. That’s the one I use to test scenarios in the lab. What I write here will work with any biometric security key with the native tools. Only the vendor-specific tools will differ.
Figure 1: The FEITIAN BioPass FIDO2 security key
Before you can use your FEITIAN security key, we need to set it up. That is a pretty straightforward process. You can use the native Windows 10 or Windows 11 tools or download the tool the FIDO2 vendor provides. Both work perfectly well, but the vendor tool often offers more capabilities.
Initial configuration
Below I will show you how to use the Windows 10 native built-in tool to configure a FEITIAN FIDO2 BioPass security key. That tool is available on Windows 19H1 and onwards and in Windows 11. After that, I will peek at the FEITIAN tool (see 未标题-1 (ftsafe.com)). You can download the FEITIAN tool from the Microsoft Store.
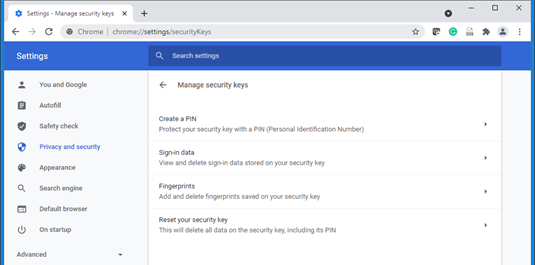
You can also use the built-in Chrome tools to do this, which is not only applicable on an Apple or Linux device but also on a Windows Server 2019 OS with the desktop experience where the built-in tool is not available.
Figure 2: Chrome can manage security keys
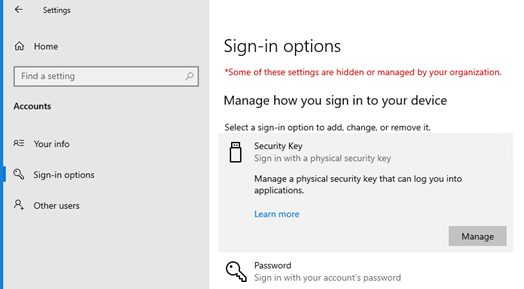
In Windows Server 2022, however, you do have built-in tools available. You can find it in Settings under Accounts, Sign-in options, Security Key.
Figure 3: Windows Server 2022 allows you to manage security keys with a built-in tool
Windows 10 built-in tool
But let’s run over how to do this with the built-in tool in Windows 10 or Windows 11.
Type “Window Security” in the search bar and click on “Windows Security.”
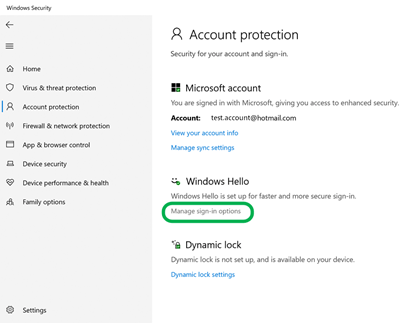
In the left pane, click on “Account Protection.”
Figure 4: Under Account Protection, Windows Hello, you can manage your sign-in options
Under “Windows Hello,” click on “Manage sign-in options.”
Figure 5: Manage your security keys
Depending on what type of client you have and if you have Windows Hello capable devices (camera, fingerprint reader, and such) and a supported environment for it, specific options will be available or not. For our use case, a FIDO2 security key, we are interested in the bottom one, “Security Key.” Select it and click on the “Manage” button.
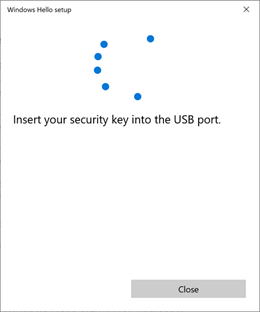
If you have not yet inserted your security key, the tool will ask you to do so. That screen will go away once you have inserted your security key. If you have already inserted it, you will not see this screen.
Figure 6: You really do have to plug in your security key
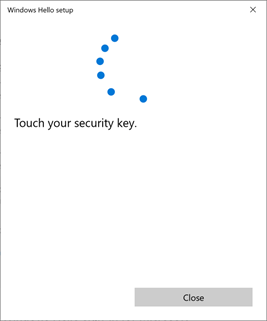
It will ask you to touch your security key. Don’t worry; this does not require your fingerprints yet. Which is logical as they are not there yet.
Figure 7:Touch your security key when asked
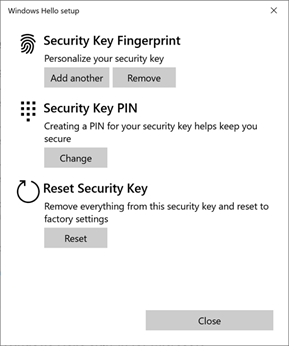
First of all, we now need to add the Security Key PIN to your security key when it is a new one or one that you have reset. That PIN helps secure your key from undesired use and can be anything between 4 and 64 characters.
Figure 8: An unconfigured security key requires you to add a PIN first
A note about your PIN
Note that a PIN does not have to be limited to 4 digits; it can be more. You can use numbers, letters, special characters, etc. That means that “My1stPIN!” is acceptable. But please do not use “1111”. You get the idea. Use something sensible and reasonably secure. It is worth noting that it will be locked out if you type in your key incorrectly too many times. You’ll need to reset your security key, which causes a bit of a hassle, as you can imagine. So choose wisely and make it something you can remember and type in correctly quickly. Also, it is wise to have a backup MFA device (smartphone, 2nd security key).
Figure 9: Enter a sensible PIN
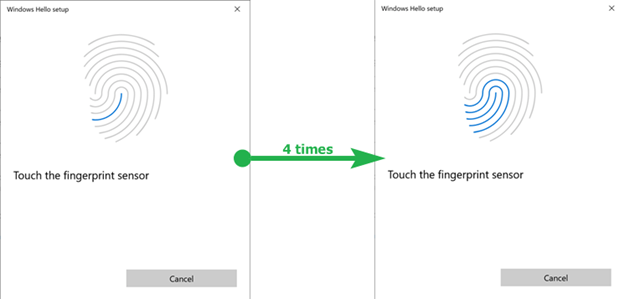
After you have set the PIN, you can enter one or more fingerprints. For example, I usually register two fingerprints of both hands. That makes sure I can log in when my thumb is in a band-aid and helps easily access the security key when I plug it into either my client device’s right or left side.
Figure 10: It takes 4 recordings to store your fingerprint.
Figure 11: Tab that security key gently 4 times
Figure 12: Success, your fingerprint is registered.
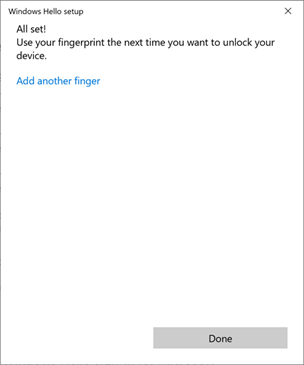
You can register different fingerprints now or come back and add them later.
Figure 13: Done!. Close the setup tool.
That’s it. The FEITIAN FIDO2 security key is now ready for use with any service that supports it.
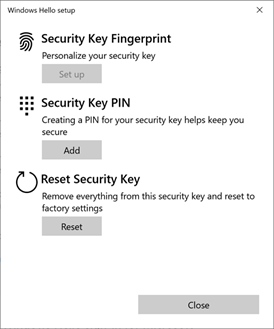
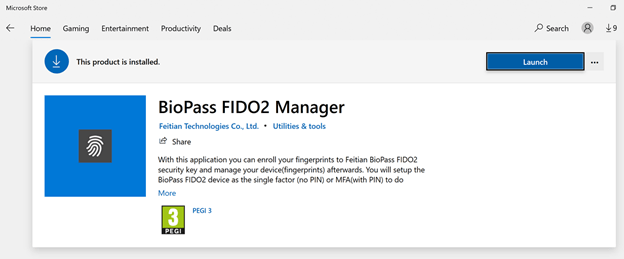
FEITIAN BioPass FIDO2 Manager
If you have downloaded the FEITIAN BioPass FIDO2 Manager tool from the Microsoft store, you will find it works similarly but with some extra advantages.
Figure 14: BioPass FIDO2 Manager from the Microsoft Store
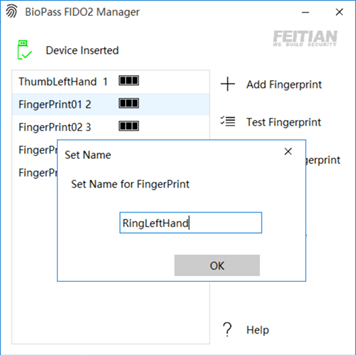
For one, you can easily list the fingerprints and test them. That way, you can figure out which ones to delete or replace. Quite handy, but it gets even better!
Figure 15: Give your fingerprints a more straightforward name
The cool thing is that you can double-click the fingerprint entries and rename them. That comes in very handy! However, I want to see this capability natively in the Windows built-in tool as well.
I will show you how to use it with your personal Microsoft account and Twitter in a subsequent blog post. With Microsoft, you have the option of going 100% passwordless, and you can delete your password. With other services, this is not always possible yet. But don’t worry, having MFA is helping you avoid 99,9% of unauthorized access to your accounts already. Why? Because most “hacks” of your identity are not real hacks or breaking into the service, but people logging into your account via stolen, derived, or guessed passwords. MFA blocks that.